Thermocouple for a gas column: design and principle of operation + self-inspection and replacement
The designs of modern gas water heaters and boilers are equipped with a number of different sensors. This is an obvious point, given the fully automatic mode of operation of such equipment. Using sensors, various parameters of the system’s operation are analyzed, and the end result is the correct adjustment of gas equipment to the appropriate operating mode.
One of the important technological sensors is a thermocouple for a geyser, which controls changes in operating temperature. In this article, we’ll talk about the device and the principle of operation of the thermocouple, methods of checking the performance. We also consider how you can replace this element with your own hands.
The content of the article:
The device and purpose of the thermocouple
Sensor elements, which are structurally a thermocouple, are widely used not only in household appliances, but also in industrial equipment. In fact, a thermocouple should be considered as a thermoelectric converter.
Typically, such a converter is used to measure ambient temperature. In particular, if we study how the thermocouple works in the design of a gas boiler, it can be noted that thanks to this sensor, the temperature of the flame of the gas burner is controlled (measured).
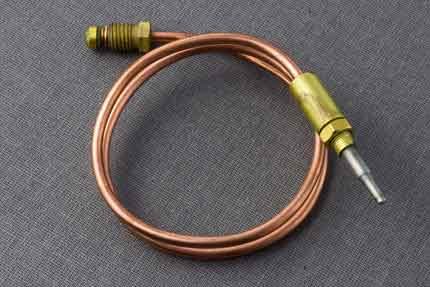
Thermocouple Design Features
The execution of a thermocouple is not particularly difficult, but from a technological point of view, the manufacture of this element requires high accuracy and compliance with the characteristics of the components used.
Actually, the main components of the sensor are two metal elements with different physical properties.
These elements (wires) are soldered at the ends on one side, while the end parts of the other side remain free - they are used to connect a thermo-EMF to the transducer and transmit the potential difference.
Principle of operation and purpose of the sensor
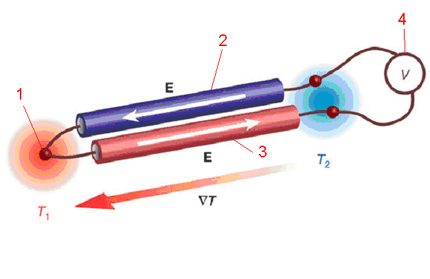
The thermoelectric effect (in other words, the Zebbek effect) determines the principle of operation of the device in question. Conductors connected at one point, made of different metals, form a potential difference, given the fact that different metals have a different coefficient of thermo-EMF.
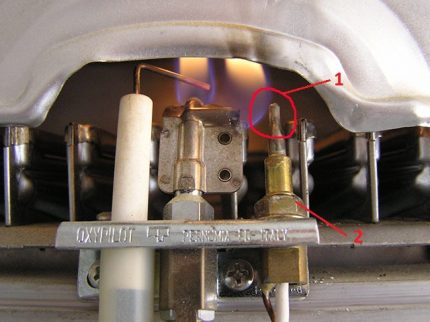
In relation to a geyser, the operation of the thermocouple provides combustion control and protection against possible gas contamination. When the burner of a gas boiler or water heater is operating in active mode (emits a flame), a thermocouple installed in the flame zone under heating generates an electric current. The amount of current is sufficient to control the opening and holding of the gas valve.
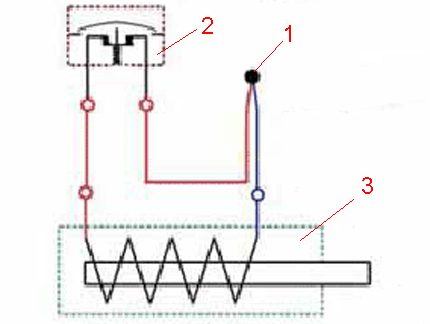
If the heating temperature drops sharply (extinguished burner flame), the value of the generated current also decreases, which leads to the closure of the gas valve. Accordingly, the gas supply to the system is blocked, which ensures the safe operation of the equipment.
If the gas valve on the gas column does not work for you, we recommend that you familiarize yourself with inspection and repair methods.
Checking the thermocouple of a home gas water heater
Long-term operation of a home gas column allows for such a moment when the thermocouple fails. In this case, it is necessary to check the functioning of the system and, accordingly, check the control sensor directly.
Of course, not all owners of gas equipment are capable of doing such a job. And from a security point of view, the best solution would be to contact gas company to solve such a problem.
But at the same time, the situations can be different, including the inability to contact specialists for some reason. Then the only way out is to try to do the work yourself.
In this scenario, the user is inexperienced in gas affairs and is interested in how to check a thermocouple on a gas boiler using a tester, a common diagnostic tool for electricians and electronics. Let's try to reveal this technological moment in order to facilitate the task.
Stage # 1 - preparation for verification by the tester
To begin with, we recall that the tester is a measuring device - pointer or digital, with which it is possible to measure:
- resistance;
- voltage value (alternating and constant);
- current strength (alternating, constant).
Marked measured values are kind of basic. And yet, modern testers are able to check a whole series of parameters, for example, inductance or capacitance.
But taking into account the principle of operation of a thermocouple of a domestic gas boiler, the voltage measurement mode in the millivolt range is quite enough.
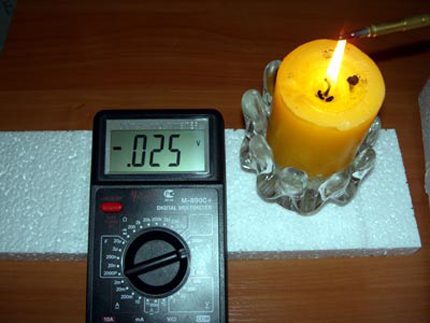
In addition to the measuring device (tester), the installer will need another fairly simple tool - a heating source. It is better if such a source has the ability to emit an open flame. Therefore, the best option here is to use a conventional paraffin candle.
Stage # 2 - Visual Inspection for Defects
The very procedure for testing the flame control sensor is simple. However, before proceeding with the hot test, it is recommended that you carefully examine the thermocouple visually from the outside.
When examining the junction area and the descending rod on the surface, physical defects of the metal, including burnout areas, should not be visible.
Stage # 3 - Sensor Health Testing
After completing the visual inspection, you can proceed directly to performing a hot test. To do this, the junction area and the downward portion of the thermocouple rod of the gas column are placed above the candle wick.
Next, a measuring device (tester) is connected to the terminal ends of the thermocouple, after which the candle is lit. The formed potential is observed on the working scale of the measuring device.
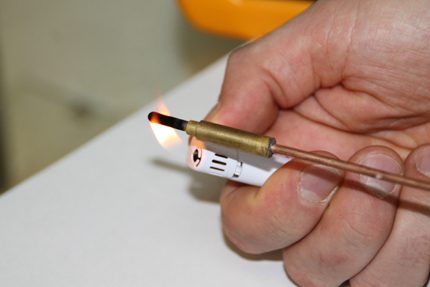
The absence of any indication of the electric potential clearly indicates a sensor malfunction. With partial defects, chaotic (unstable) readings of units of millivolts can be noted on the measuring device. If the geyser sensor is serviceable, as a rule, a stable value equal to tens of millivolts (20-30 mV) is recorded on the device.
Moreover, as the thermocouple body heats up with a candle flame, the readings on the scale of the device slightly change upwards. If the flame of the candle is extinguished, the tester readings will rush to zero as the core of the rod and the junction area cool down. That's all. With this development of events, a thermocouple, as it is in good working order, can be safely set at the scene.
How to replace the temperature sensor?
Most of the repair (replacement) thermocouples of a household gas column require the dismantling of this element from the equipment design. Accordingly, the potential master must be aware of how to remove and install the sensor. Consider how the replacement of a thermocouple is performed in a gas boiler and what is needed for this.
The tool kit is quite simple. Usually one or two open-end wrenches are required for a 14 (or 15) nut.
It is worth noting that, based on the specific boiler model, the size of the fastening nuts may differ, as well as the design of the thermocouple. On some models, the thermocouple is screwed.
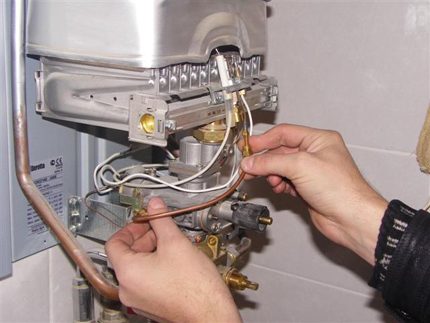
Thus, the master needs to free the sensor from the fixing screws, after which the structure is removed and can be repaired or replaced with a new one. The installation of the new element is carried out in the reverse order.
Have a problem with a thermocouple gas column? In this case, we recommend that you familiarize yourself with repair and replacement instructions.
Conclusions and useful video on the topic
The video below demonstrates the process of testing a thermocouple installed on one of the gas boiler models.
The video material explains in detail how to remove, check, change a significant component of the gas column, without which the equipment actually remains operational only in the uncontrolled mode, which is extremely dangerous for the end user:
Do-it-yourself sensor replacement is possible.However, for this, the home master must have locksmith skills, be able to use measuring devices:
Thanks to the thermocouple, the process of ignition and heating is automated, the degree of operation safety of the gas column and boiler is increased. The considered material allows not only to fully evaluate the technological significance of the thermocouple device in the design of gas-using equipment and to understand the structural intricacies of home boilers, but also, if necessary, to repair the equipment with your own hands. It is important to remember the safety rules, and if you have doubts about your own strengths, it is better to contact specialists.
Would you like to talk about your personal experience in checking the performance of a thermocouple? Or do you have useful information on the topic of the article and want to share your knowledge with other users? Write your comments, participate in discussions - the feedback form is located below.

 The principle of operation of a gas column: features of the device and operation of a gas water heater
  Membrane for a geyser: purpose, principle of operation + replacement instructions
  Replacement of a geyser in an apartment: replacement paperwork + basic norms and requirements
  Do-it-yourself gas column installation in an apartment: requirements and technical standards for installation
  Do-it-yourself repair of a gas column heat exchanger: the main stages of soldering a copper radiator
  Electrolux Geyser Troubleshooting: Diagnosing Popular Breakdowns and Troubleshooting
  How much does it cost to connect gas to a private house: the price of organizing gas supply
  The best washing machines with dryer: model rating and customer tips
  What is the color temperature of light and the nuances of choosing the temperature of the lamps to suit your needs