Ventilation of the bastu in the bath: advantages and disadvantages + instructions for the arrangement
Perhaps you consider yourself a connoisseur of bathing relaxation or just love it. There are many such people, and some have their own baths, but even they make mistakes. You've probably heard about the importance of ventilation - they are often mistaken when installing it, especially for the bastu system, which provides many options for air outlet. Proper ventilation of the bastu in a Russian-type bath with its high humidity gives many advantages.
Having studied our article, you will be able to choose the parts yourself and assemble the ventilation duct without any outside help. Work will take a lot of time, but it will not be difficult if you know everything. We will also talk about the advantages and disadvantages of ventilation bastu.
Bastu works with a certain air circulation. Much depends on the layout of the bath - you will need to combine your own comfort and the ideal layout for ventilation. Find out more about how this ventilation system and its components work from our article.
The content of the article:
Feature of the ventilation of the bastu in the bath
Baths and saunas have steam rooms, and with different conditions they all need ventilation. The steam room air is updated up to several times per hour. The ventilation drawing is drawn in advance, sometimes they are chosen among standard solutions for each size.
The word "bastu" is translated from Swedish as a sauna. From it came the name of the type of ventilation. At the top, this system is closed, and at the bottom it works as a supply and exhaust system. The ventilation includes any heaters, if they can heat the air flow.
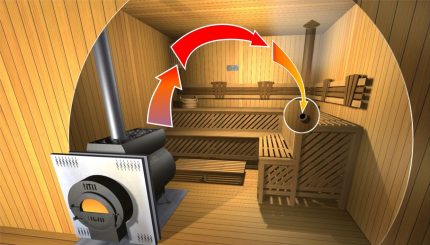
A detailed ventilation scheme for bastu looks like this:
- Air through the supply channel enters the steam room from the street. In the classic and most common version, this is exactly what happens.
- The influx enters the room in a place under the stove (in the floor or at the bottom of the wall) and heats up from it.
- Warm air goes up and mixes with steam. Under the ceiling it cools down gradually and begins to fall down. Steam saturated with microscopic drops of water also moves.
- So that the air does not spin around the steam room and the excess carbon dioxide does not harm visitors, it should be cleaned out.
- The natural exhaust method works: air, after it sinks to the floor, starts to go into the bottom hole of the vertical pipe. The pressure difference leads to its suction and movement along the channel up and further into the street. The pipe also heats up and raises the air temperature, which helps to raise it.
- Before going outside, air passes from a vertical pipe to a horizontally located tee, which is higher. One end of this part goes into the street, and the other into the room. The second should close the stub. It is cleaned for normal ventilation and to reduce heat.
- Another and more effective option is when there is no horizontal movement in the exhaust system, and its vertical pipe exits through the roof. This type of bast also has a tee - shorter and with vertical rather than horizontal placement.
Bastu works without fans / superchargers and only due to the natural movement of air.
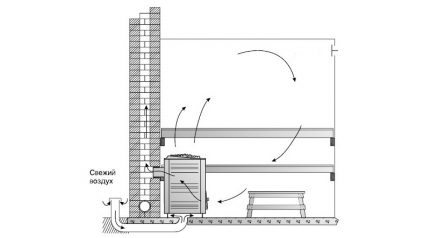
The street opening of the exhaust duct should be the end of the pipe, not a flat passage. Remember power bath stove. The higher it is, the more important is the rotation of the air in the bastu pipes. The thrust weakens from a change in movement.
Due to their high power, the instructions for the quick-cooking stoves suggest making a strictly vertical exhaust duct with an outlet through the roof. Keep this in mind. Due to the pattern with a turn and a powerful stove, the tree will begin to rot, and it will become difficult to control humidity.
The stove can be located in an open place or behind a partition, then the incoming air will exit above it. Sometimes in the steam room there is only a heater, from which the air is heated, and the furnace remains isolated.
The exhaust air enters the exhaust pipe at a small height above the floor or falls under it and enters the channel, the opening of which is also below the floor. Sometimes the cooled air goes under the seats of the shelf, where it enters the pipe. In some saunas, the canal is hidden in a box, in a wall or behind it.
The exhaust part of the basta is placed closer to the corner, and if the stove also has an angular arrangement, then the pipe is placed diagonally opposite.
Do not raise the inlet of the exhaust duct above the knees - it will be too cool below. In Russian baths, they maintain high humidity, so sometimes you have to install an adjustment valve on the hole. They reduce the outflow of air if the bath began to lack moisture.
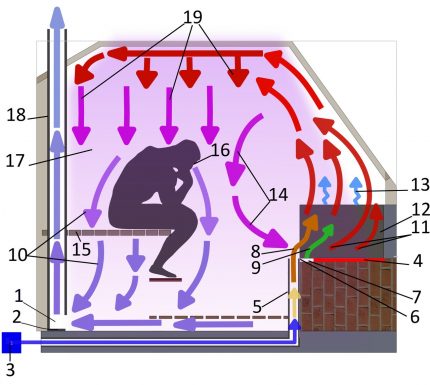
Bastu ventilation is suitable for simple steam rooms and combined with a sink. Pipes are made of stainless or galvanized steel.
Sometimes they take channels for the drainage system and insert into each other, but are more suitable air ducts.
Benefits of Bastu Ventilation
The main plus of circulation with a closed upper part of the room is that the air warms up more evenly. Items in such a steam room also heat up better.
Other advantages of air exchange according to the bastu principle:
- fresh air arrives for heating - from the street;
- pleasant smell in the steam room;
- no additional ventilation devices are needed;
- more health benefits;
- lightweight bath care;
- large comfort zone in the steam room.
The ventilation system according to the bast principle has three options for the operation of the exhaust duct. With the plug open and the bottom valve, it will become much drier, and the steam room will receive fresh air through the exhaust part.
With the lid closed and the valve open in the steam room, the pressure will decrease and excess moisture will go away - this is the operating mode. Without a plug and with a closed gate under the horizontal exhaust pipe in the steam room it becomes cooler and fresher.
Disadvantages of a bastu ventilation system
Cons manifest themselves in different ways, depending on the situation. Wood burning stoves emit carbon monoxide, so you can only enter the steam room after complete combustion. During this time, the supply part of the bastu system will noticeably cool the room and the stove. You will have to fire a large amount of firewood, which is even worse, more expensive and inconvenient in time.
It will be possible to reduce the consumption of raw materials after kindling with any ventilation, optionally like basta. It’s enough to clog it.
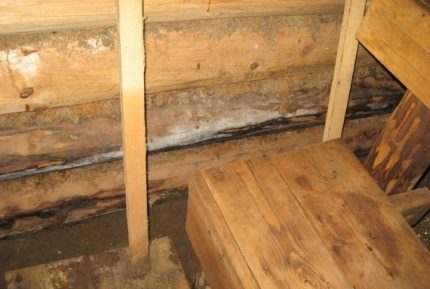
In Russian baths, it is customary to add water to hot stones. More humid air burns harder, and with ventilation the bastu falls to the attendants almost without losing in temperature, especially if the air outlet is placed under the shelf. We'll have to open the window more often.
Weaknesses of such ventilation:
- Low power. The exhaust part copes worse with air discharge compared with the upper ventilation, ash pan of the furnace, and mechanical systems.
- You can’t put a filter under the stove, it will melt.
- On a calm day, traction is reduced.
- Strong gusts of wind lead to drafts, cold at floor level.
The main disadvantage of the bastu is its relatively low power.
Ways to increase ventilation power
Power is increased in several ways. If the ash pan of the furnace is in the steam room, then it should be surrounded by elevation. Near the stove, the air heats up, then makes a semicircle along the upper half of the steam room and, already heavier and cooler, will first fall on the opposite side. Due to the difference in height and draft in the ash pan, cold air will enter the furnace (combustion chamber) of the furnace, from where it will exit through the chimney.
Most often, an ashpit is placed in the relaxation room, and the closed part of the furnace is sent to the steam room. Then, under the steam room floor, you can place a pipe for extracting exhaust air, an opening at the wall farthest from the rest room. Bring the opposite end of this exhaust duct to the ash pan in the rest room. The draft of the furnace will remove air from the building much faster than the exhaust pipe in the steam room.
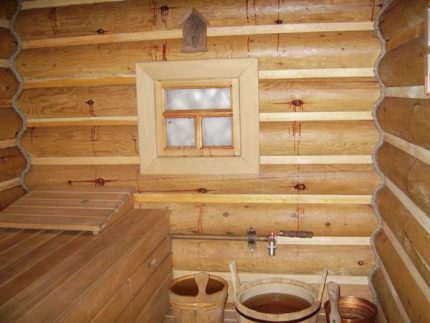
The exhaust duct should still be left for additional ventilation. Just below the junction of the vertical and horizontal pipes should stand gate to deactivate traction. Close it to remove air only through the ash pan of the furnace.
In the case of a chimney with a horizontal outlet, the effect of external air is manifested. Its flows descend along the slopes of the roofs and weaken the traction. In winter, another problem appears. Cold street air begins to mix with warm from the outlet with a gust of wind. Two streams swirl and further weaken the operation of the exhaust duct.
Consider the size of the ramps. If possible, draw a street conclusion from the side of the forceps, where there are no overhangs. It is worth protecting yourself from the cold wind in winter at the design stage of the bathhouse itself. Protect the side under the external terminal on the side with a building or some kind of blockage.
Do not forget about the straightforward version with the output through the ceiling and roof.
Installation of a ventilation system bastu
We will do everything with our own hands, and before collecting ventilation in the bathhouse, we proceed step by step: we select the material, the elements of the bast, we collect them to the ceiling level.
Given all the nuances, it makes sense to try a system with a tap into the pipe going through the roof. First, select the material. Parts made of stainless steel will last twice as long - up to 50 years, but galvanizing can better withstand pressure, bending and many other types of loads.
Preparation of tools and materials
The number of parts is selected based on the height of the building. Above the roof, the pipe needs to be raised more than a meter, and the bottom should be placed just above the floor or under the seats of the shelf.
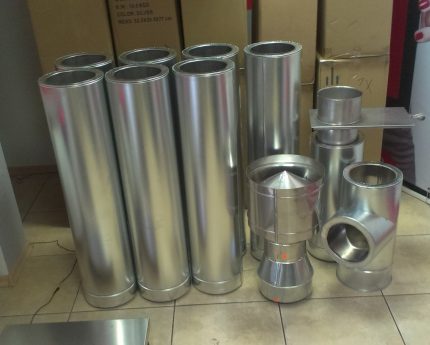
Let us dwell on the following set for the exhaust part of ventilation:
- 3 or 4 pipes 1.25 m long, 110 mm cross-section;
- 2 channels of the same length, section 180 mm;
- tee with a cap;
- globular turbo deflector;
- adapter from 110 mm to 180;
- gate
We will collect the elements one into the other. We will make sandwiches with insulation from pipes of different widths - at the level of the attic and roof. Connect the adapter to the channel at about the ceiling level. It is better to take the gate with a rotary damper, rather than a retractable one. It will be more convenient.
A tee with a strictly vertical assembly will be inside the building. The deflector will help to pull the air more intensively, and it works from the wind. The turbo deflector spins and boosts traction almost always, even in light winds.
Ventilation training
We begin to connect the parts of the exhaust part of the system. We take the gate and put it into a pipe with a cross section of 110 mm. We place the elements on a solid surface and fasten it with thirteen screws on 3 or 4 sides - we use a screwdriver. The gate will be at a convenient height control.
At an accessible distance from the floor, but at the top of the steam room you need to place a tee with a lid. With a strictly straight pipe direction, the part is fixed vertically.
We take the pipe 110 mm and cut off the fragment for insertion between the gate and the tee, enough is less than half a meter. The length of the intermediate segment depends on the ceiling height more than all other parameters. We measure the steam room vertically. Usually it is 2.1-2.4 meters. Then we insert the cut fragment into the gate and drill it. Then we attach a tee to the intermediate part. We work with a screwdriver.
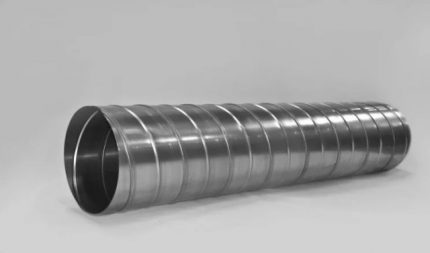
We bring each element into the previous one and gently press it. Next we take a straight pipe, again with a width of 110 mm, but not the full length, but the rest after the previously cut fragment. We insert into the tee through the hole in the ceiling, fasten inside the steam room. We strengthen all connections from the bottom of the exhaust system with tape to achieve a normal density. With subsequent we do the same.
In the attic, insert a sandwich from pipes of 110 and 180 mm. If necessary, we trim these channels. We place the insulation with a sandwich, and not openly - to protect it from adverse factors. Among the insulation materials, we choose either mineral / glass wool, or foamed based on polymers.
We select the thickness of the insulation, fix it with glue, fix it with tape or adhesive foil to the largest possible area. We install a 180 mm pipe on the insulation, and the sandwich is ready.
Then we start the adapter from 110 mm to 180 into the finished part of the exhaust structure, we fix it. We insert the insulated part into the transition element, fasten it with screws and seal it with tape. We make another sandwich - part of the system that will be above the roof.
Cut a hole on the roof. If the roof is made of corrugated sheet, then we make a hole without outside help. We drill points around the circumference under the width of the pipe and squeeze out the unnecessary middle.We insert one more of the same into the previously installed sandwich. We go to the attic and fix it with hardware and tape.
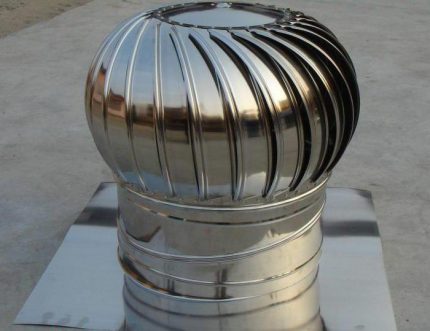
We install a master flash on the roof. We process its edges with sealant and fasten with large self-tapping screws. At the top of the last pipe we place a turbo deflector. Joints are treated with adhesive tape, including on a master flash and in front of the deflector. The main stage of work ends there.
Decorate the pipe inside the steam room. To hide the tape, small dents and bumps, we put on it a lining with imitation wood or brickwork. We screw the wooden handle to the lid of the tee.
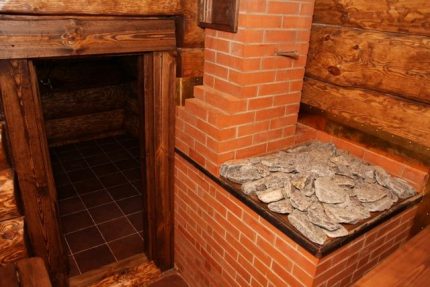
For better draft of the incoming air in the supply part of the system, it should be done with a pipe, but only the void between the brickwork will also cope with the task. A gap of at least 5 cm is allowed.
Ideally, air is let in so that it exits exactly under the stove and vertically. Then drafts with strong winds will be less noticeable. The air inlet is fenced with a small podium approximately two bricks high. Often they put one row with an edge. The air supply from the street will be regulated by a rectangular butterfly valve.
We also recommend that you read our other article, where we spoke in detail about the best schemes for organizing ventilation in the bathhouse. More details - go to the link.
Conclusions and useful video on the topic
Bastu ventilation drawing with a transition from a vertical exhaust channel to a horizontal one:
Three interesting nuances in installing a ventilation system:
What is the best way to do the bastu ventilation, examples of errors, and what they lead to:
Now you know what ventilation of the bast is and how it is possible to improve circulation in the bath, to make it more comfortable. We talked about how the ventilation system is arranged, how it works, and also went over the main options for installing it. Even if you did not understand the design of the bath before, the main thing about its ventilation is now you know and you can assemble a new bastu system or improve the old one.
Write comments if you collected ventilation for the bath or thought to do it. Tell us about your steam room. Perhaps you are only planning to build a bathhouse and do not know where to start the arrangement of ventilation? Ask your questions in the form under the article.

 Window sill ventilation: methods and detailed instructions for arranging window sill ventilation
  Ventilation in a country toilet with a cesspool: step-by-step instructions and recommendations for arrangement
  Ventilation of a septic tank in a private house: is it needed + tips for arranging
  Ventilation in the bath: an overview of traditional schemes and nuances of arrangement
  Do-it-yourself ventilation of the cellar in the garage: installation methods and procedures + useful tips for arranging
  Ventilation of a vegetable pit in a garage: organization of air exchange in a garage vegetable store
  How much does it cost to connect gas to a private house: the price of organizing gas supply
  The best washing machines with dryer: model rating and customer tips
  What is the color temperature of light and the nuances of choosing the temperature of the lamps to suit your needs
  Replacement of a geyser in an apartment: replacement paperwork + basic norms and requirements