How to make a solar battery with your own hands: self-assembly instruction
Solar panels are a source of energy that can be used to generate electricity or heat for a low-rise building. Here are just solar panels have a high cost and are not available to most residents of our country. Do you agree?
It’s another thing when a solar panel is made with your own hands - the costs are significantly reduced, and such a design works no worse than an industrial panel. Therefore, if you are seriously thinking about purchasing an alternative source of electricity, try to do it yourself - this is not very difficult.
The article will focus on the manufacture of solar panels. We will tell you what materials and tools will be required for this. And a little below you will find step-by-step instructions with illustrations that clearly demonstrate the progress of work.
The content of the article:
Briefly about the device and work
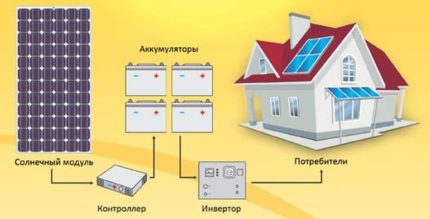
The energy of the sun can be converted into heat when the energy source is a heat transfer fluid or into electrical energy collected in batteries. The battery is a generator operating on the principle of the photoelectric effect.
The conversion of the energy of the sun into electricity occurs after sunlight enters the plate-solar cells, which are the main part of the battery.
In this case, light quanta “release” their electrons from extreme orbits. These free electrons give an electric current that passes through the controller and accumulates in the battery, and from there it goes to energy consumers.
Silicon elements act as photocell plates. A silicon wafer is coated on one side with a very thin layer of phosphorus or boron - a passive chemical element.
In this place, under the influence of sunlight, a large number of electrons are released, which are held by the phosphorus film and do not fly apart.
There are metal “tracks” on the surface of the plate, on which free electrons line up, forming an ordered movement, i.e. electricity.
The more such silicon wafer-photocells, the more electric current can be obtained. Read more about the principle of operation of the solar battery Further.
Materials for creating a solar plate
Starting to build a solar battery, you must stock up on the following materials:
- silicate plate-photocells;
- chipboard sheets, aluminum corners and battens;
- rigid foam rubber with a thickness of 1.5-2.5 cm;
- a transparent element that acts as a base for silicon wafers;
- screws, screws;
- silicone sealant for outdoor use;
- electrical wires, diodes, terminals.
The amount of materials required depends on the size of your battery, which is most often limited by the number of available photocells. Of the tools you need: a screwdriver or a set of screwdrivers, a hacksaw for metal and wood, a soldering iron. To test the finished battery, you need a tester-ammeter.
Now consider the most important materials in more detail.
Silicon wafers or photocells
There are three types of solar cells for batteries:
- polycrystalline;
- monocrystalline;
- amorphous.
Polycrystalline wafers are characterized by low efficiency. The size of the beneficial effect is about 10 - 12%, but this indicator does not decrease over time. The duration of the polycrystals is 10 years.
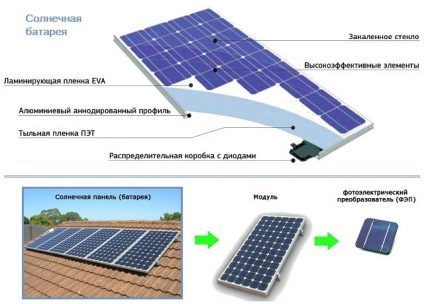
Monocrystalline photocells boast a higher efficiency of 13-25% and a long life of over 25 years. However, over time, the efficiency of single crystals decreases.
Single-crystal converters are obtained by sawing artificially grown crystals, which explains the highest photoconductivity and productivity.
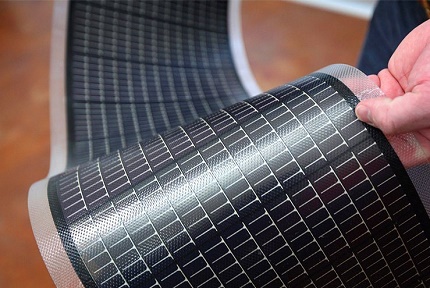
Flexible amorphous silicon batteries are the most advanced. The photoelectric converter is sprayed or deposited on a polymer base. Efficiency in the region of 5 - 6%, but film systems are extremely convenient to install.
Film systems with amorphous photoconverters appeared relatively recently. This is an extremely simple and extremely cheap form, but faster than rivals losing consumer qualities.
It is inappropriate to use photocells of different sizes. In this case, the maximum current generated by the batteries will be limited by the current of the smallest cell.Hence, larger plates will not work at full capacity.
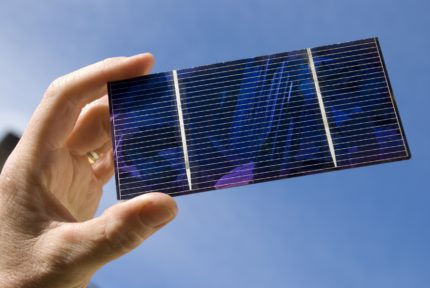
Most often, for self-made batteries, monocrystalline and polycrystalline photocells 3x6 inches in size are used, which can be ordered in online stores like E-buy.
The cost of solar cells is quite high, but many stores sell the so-called elements of group B. Products assigned to this group are defective, but suitable for use, and their cost is lower than that of standard plates by 40-60%.
Most online stores sell solar cells in sets of 36 or 72 photovoltaic conversion plates. To connect individual modules to the battery, buses will be required, and terminals will be needed to connect to the system.
Wireframe and transparent element.
The frame for the future panel can be made of wooden battens or aluminum corners.
The second option is more preferable for a number of reasons:
- Aluminum is a light metal that does not give a serious load to the supporting structure on which the battery is planned to be installed.
- When carrying out anti-corrosion treatment, aluminum is not susceptible to rust.
- Does not absorb moisture from the environment, does not rot.
When choosing a transparent element, it is necessary to pay attention to such parameters as the refractive index of sunlight and the ability to absorb infrared radiation.
The efficiency of photocells will directly depend on the first indicator: the lower the refractive index, the higher the efficiency of silicon wafers.
Plexiglass or its cheaper version, Plexiglas, has the minimum light reflectance. Polycarbonate has a slightly lower refractive index.
The value of the second indicator determines whether the silicon photocells themselves will heat up or not. The less the plates are heated, the longer they will last. IR radiation is best absorbed by a special heat-absorbing plexiglass and glass with IR absorption. A little worse - ordinary glass.
If possible, then the best option would be to use anti-reflective transparent glass as a transparent element.
System design and site selection
The design of the solar system includes the calculation of the required size of the solar plate. As mentioned above, the size of the battery is usually limited by expensive photocells.
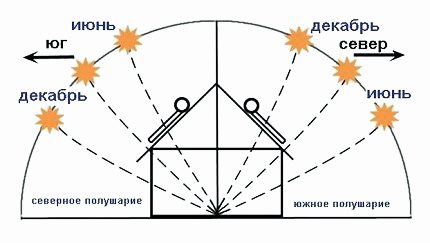
The solar battery must be installed at a certain angle, which would ensure maximum exposure to silicon wafers of sunlight. The best option is batteries that can change the angle.
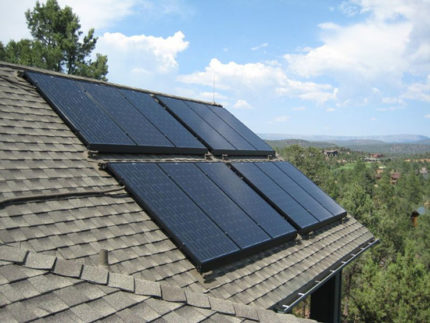
The place for installing solar plates can be the most diverse: on the ground, on a pitched or flat roof of a house, on the roofs of utility rooms.
The only condition is that the battery should be placed on the sunny side of the site or house, not shaded by a high crown of trees. In this case, the optimal angle of inclination must be calculated by the formula or using a specialized calculator.
The angle of inclination will depend on the location of the house, season and climate. It is desirable that the battery has the ability to change the angle of inclination following seasonal changes in the height of the sun, because they work as efficiently as possible when sunlight falls strictly perpendicular to the surface.
Calculations show that 1 square meter of the solar system makes it possible to get 120 watts. Therefore, by calculations it can be established that in order to provide the average family with electricity in the amount of 300 kW per month, a solar system of at least 20 square meters is needed.
Immediately install such a solar system will be problematic. But even installing a 5-meter battery will help save energy and make a modest contribution to the ecology of our planet. We also recommend that you familiarize yourself with the principle of calculating the required quantity. solar panels.
The solar battery can be used as a backup energy source with frequent shutdowns of centralized power supply. For automatic switching, it is necessary to provide an uninterruptible power system.
Such a system is convenient in that when using a traditional source of electricity, charging is performed simultaneously solar system battery. The equipment serving the solar battery is located inside the house, therefore, it is necessary to provide for it a special room.
Installing a solar panel in steps
Choosing a place to place a solar panel and equipment for servicing the solar system, as well as having all the necessary materials and tools, you can begin installing the battery.
During installation, it is necessary to observe safety precautions, especially when installation of the finished panel on the roof of the house. Consider a step-by-step algorithm on how to make a solar battery.
Step # 1 - soldering silicon wafer contacts
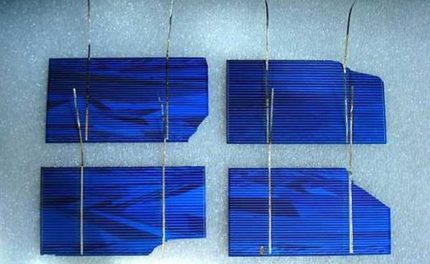
Installation of a homemade solar battery often begins with the soldering of photocell conductors. Of course, if you have the opportunity, it is best to buy solar cells immediately with conductors, as soldering is a very difficult and painstaking work that takes a lot of time.
Soldering is carried out as follows:
- A silicon photocell without conductors and a metal strip-conductor are taken.
- The conductors are cut using a cardboard blank, their length is 2 times greater than the size of the silicon wafer.
- The conductor is neatly laid out on the plate. On one element - two conductors.
- At the place where the soldering will be performed, it is necessary to apply acid to work with the soldering iron.
- Solder with a soldering iron by carefully connecting the conductor to the plate.
During soldering, do not press on the silicate element, as it is very fragile and can collapse! If you are lucky and you have purchased photocells with ready-made contacts, then you will save yourself from long and difficult work, proceeding immediately to the manufacture of the frame for the future battery.
Step # 2 - making the frame for the solar panel
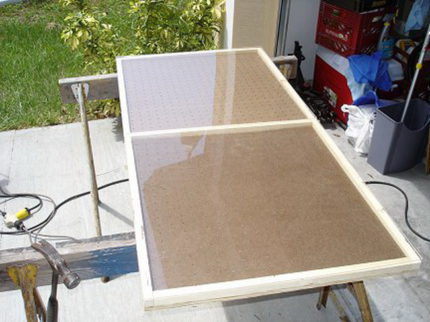
The frame is the place where the photocells will be installed.For the manufacture of the frame, aluminum corners and slats are taken, from which the frames are folded. Recommended corner size is 70-90 mm.
Silicone sealant is applied to the inside of the metal corners. Sealing corners must be done carefully, the durability of the entire structure depends on this.
After the aluminum frame is ready, proceed to the manufacture of the rear housing. The rear case is a wooden box made of chipboard with low sides.
High sides will create a shadow on the photocells, so their height should not exceed 2 cm. The sides are screwed using self-tapping screws and a screwdriver.
At the bottom of the box-case, ventilation holes are made of chipboard. The distance between the holes is about 10 cm. A transparent element is installed in the aluminum frame (plexiglass, anti-reflective glass, plexiglass).
The transparent element is pressed and fixed, its fastening is carried out using hardware: 4 at the corners, as well as 2 from the long and 1 from the short side of the frame. Hardware fasten with screws.
The frame for the solar battery is ready and you can proceed to the most critical part - the installation of solar cells. Before installation, it is necessary to clean plexiglass from dust and degrease with an alcohol-containing liquid.
Step # 3 - mounting silicon wafer photocells
Mounting and soldering silicon wafers is the most time-consuming part of creating your own solar panel. First, we lay out the photocells on plexiglass with blue plates down.
If you are assembling the battery for the first time, then you can use the substrate for marking to place the plates exactly at a small (3-5 mm) distance from each other.
- We solder the photocells according to the following wiring diagram: “+” tracks are located on the front side of the plate, “-” - on the back. Before soldering, gently apply flux and solder to connect the contacts.
- We solder all the photocells sequentially in rows from top to bottom. The rows should then also be interconnected.
- Getting to sticking photocells. To do this, apply a small amount of sealant to the center of each silicon wafer.
- We turn the resulting chains with the photocells face up (where the blue plates are) up and place the plates according to the markings that were applied earlier. Carefully press each plate to lock it in place.
- The contacts of the extreme photocells are displayed on the bus, respectively, “+” and “-“. A wider silver conductor is recommended for the tire.
- The solar battery must be equipped with a blocking diode, which connects to the contacts and prevents the discharge of batteries through the structure at night.
- In the bottom of the frame, we drill holes for the output of wires to the outside.
The wires must be attached to the frame so that they do not hang, you can do this using silicone sealant.
Step # 4 - testing the battery before sealing
Testing the solar panel must be carried out before it is sealed in order to be able to eliminate malfunctions that often occur during soldering. It is best to test after soldering each row of elements - it is much easier to detect where the contacts are poorly connected.
For testing, you will need a regular household ammeter. Measurements must be carried out on a sunny day at 13-14 hours, the sun should not be hidden by clouds.
We take out the battery to the street and install in accordance with the previously calculated angle of inclination. We connect the ammeter to the battery contacts and measure the short circuit current.
The meaning of testing is that the working force of the electric current should be 0.5-1.0 A lower than the short circuit current. The readings of the device should be higher than 4.5 A, which indicates the operability of the solar battery.
If the tester gives less readings, then somewhere the sequence of connecting the photocells is probably broken.
Usually homemade solar battery, constructed from group B photocells, gives a reading of 5-10 A, which is 10-20% lower than that of industrial solar panels.
Step # 5 - sealing the photocells placed in the housing
Sealing can only be done by making sure that the battery is working. For sealing, it is best to use an epoxy compound, but given that the material consumption will be large, and its cost is approximately 40-45 dollars. If a little expensive, then you can use the same silicone sealant instead.
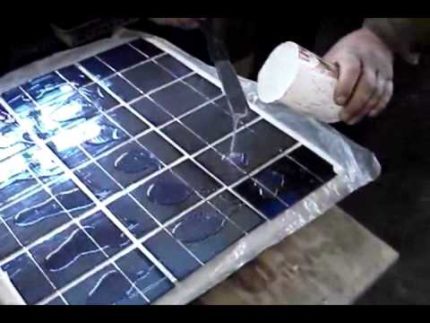
There are two ways to seal:
- full filling when the panels are filled with sealant;
- applying sealant to the space between the photocells and to the outermost elements.
In the first case, the sealing will be more reliable. After pouring, the sealant should set. Then, plexiglass is installed on top and pressed tightly to the plates coated with silicone.
To ensure cushioning and additional protection between the rear surface of the photocells and the frame made of chipboard, many craftsmen advise installing a pad of rigid foam rubber with a width of 1.5-2.5 cm.
This is optional, but desirable, given that the silicon wafers are quite fragile and easily damaged.
After installing plexiglass, a load is placed on the structure, under the influence of which air bubbles are squeezed out. The solar panel is ready and after repeated testing it can be installed in a pre-selected location and connected to the solar system of your home.
Conclusions and useful video on the topic
Overview of photocells ordered from the Chinese online store:
Video instruction for the manufacture of a solar battery:
Making a solar battery with your own hands is not an easy task. The efficiency of most of these batteries is lower than that of industrial panels by 10-20%. The most important thing in the design of a solar battery is to choose and install the solar cells correctly.
Do not try to immediately create a huge area panel. Try to build a small device first to understand all the nuances of this process.
Do you have practical skills in creating solar panels? Please share your experience with visitors to our site - write comments in the block below. There you can ask questions about the topic of the article.

 How to make a solar battery with your own hands: methods of assembly and installation of a solar panel
  How to make a solar collector for DIY heating: a step-by-step guide
  DIY solar generator: instructions for making an alternative energy source
  Plastic Bottle Solar Collector: A Step-by-Step Guide to Helio Assembly
  The principle of operation of the solar battery: how the solar panel is arranged and works
  Types of solar panels: a comparative overview of designs and tips for choosing panels
  How much does it cost to connect gas to a private house: the price of organizing gas supply
  The best washing machines with dryer: model rating and customer tips
  What is the color temperature of light and the nuances of choosing the temperature of the lamps to suit your needs
  Replacement of a geyser in an apartment: replacement paperwork + basic norms and requirements
In my humble opinion, the collection and installation of solar panels is an extremely thankless task from a financial point of view. This does not concern the moral side. As long as there is no state support in this field, as is happening in some places in the USA, there will be little sense in exploiting alternative energy sources. Once upon a time they tried to make the home server work exclusively from solar energy. Bottom line - they spent more time than they saved money. But for the overall development - it was useful!
I don’t feel like “Homemade”, able to build a solar battery. If I decide to arrange heating in the country in this way, I will buy ready-made ones. For many reasons. Firstly, I doubt the quality of Chinese photocells. Secondly, I’m not sure that having bought the right amount of material, I will make a working solar battery out of it, and not spoil it.And thirdly, it takes time to manufacture, but I don’t have it.
How much money will it take to put everything in order? Those who have money do not need it. And those who do not have money will never allow themselves this.
The question here is not only and not so much in money, but in the absence of "exhaust".
In most of our vast country there are not so many sunny days. Therefore, solar panels will be effective for three months a year. And to buy a ready-made solar battery is now no more expensive than to do it yourself. I saw an experiment on the Internet - a man ordered solar cells, but he did the rest himself and still came out at a price about the same if he ordered a ready-made factory solar battery.
Much depends on the amount of sun per year and the angle of inclination. I have solar panels made on the basis of monolithic polycarbonate panels. My jamb - did not drain. Now I will drill holes in the back sheet to remove condensate.