What to do if the tap is flowing: causes of leaks and methods for their elimination
Every home craftsman should know what to do if a faucet flows in the kitchen or in the bathroom. The economical owner must be able to quickly and accurately determine the cause of the malfunction. Indeed, because of such a minor malfunction, it is simply ridiculous to call a plumber and pay him money. Do you agree?
A set of tools for repairing faucets usually consists of screwdrivers, a set of open-end wrenches, an adjustable wrench, and a fum tape. This kit, together with the necessary seals and accessories, will help any person to cope independently with most of the problems with a crane. Here you will learn how to use them in business.
We will tell you how to diagnose valves, mixing devices and adjacent water supply elements. For independent masters, we have disassembled and outlined all the options for carrying out repair operations.
The content of the article:
Causes of the tap
The appearance of a leaking tap evokes a wide variety of emotions in people: from a shock state with an adrenaline rush from housewives to a joyful anticipation of an upcoming repair from seasoned business executives. If the leak is strong, then first you need to shut off the water supply to the living room completely, and only then deal with the causes of breakdown of the mixer.
To diagnose a leak, you can gradually open the supply tap to determine the exact place where the water is dripping.
A variety of designs of mixers allows you to classify leaks only at the characteristic places of breakdowns:
- Dripping water directly from the gander.
- Leakage from under the valve (flywheel).
- Leak at the points where pipes or hoses are attached to the mixer body.
- Leakage at the base of the spout.
When diagnosing a leak source, one must remember that any tap is a hollow sealed device, and the only cause of water leakage is the depressurization of its constituent parts. Consider repairing a faucet in the kitchen or in the bathroom.
A common cause of leaky articulated mixers is a common sand grain that is stuck in the gap between the moving parts of the device. This is the simplest case, requiring only cleaning:
However, in order to avoid such situations, i.e. sand grains entering the appliance are strongly recommended to install mud filters in front of the hinged mixers.
If the damage is serious and the repair does not lead to the desired results, then only the problem can be fixed mixer replacement. How to change the reinforcement is described in detail in our article.
Dripping water from a gander
The first time the problem of dripping water from a spout is most often determined at night, when in complete silence the rhythmic sound of a drop falling does not let the household fall asleep. Pulling the repair in such cases is not worth it, because it is quick and easy. In most such cases, leaking pads or cartridges are the cause.
Repair of the gander of the valve crane
It is necessary to begin the replacement of the valve control head with the overlapping water in the house. The problem of the flow of valves with valve heads is the defect or deterioration of the gasket adjacent to the saddle of the mixer body. To replace it, it is necessary to carry out a series of sequential actions.
The first one. Unscrew and remove the valve body. Typically, the flywheel is fastened with a bolt hidden under a decorative cap. You can pry off the cap that covers the bolt with a small flat screwdriver or an ordinary awl.
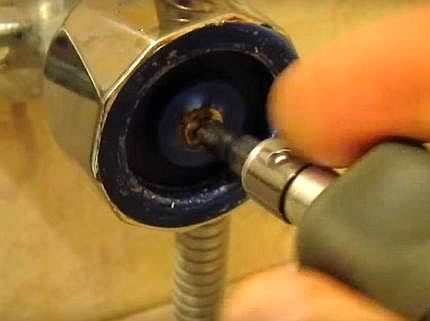
The second one. Unscrew the head itself with an open end wrench.
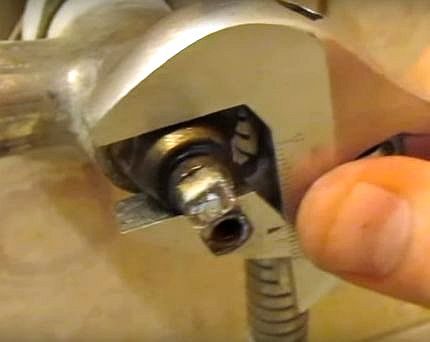
Third. It is necessary to remove the old worn rubber gasket and put a new one. Gum costs a penny, but it will provide several years of peace of mind to your nerves. And if you have a choice, you need to buy products from more reliable manufacturers.
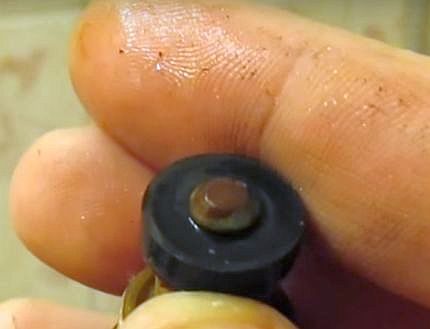
Fourth. Dry and scrape the saddle on the mixer body with a metal washcloth or other abrasive material, and then wipe it clean.
Fifth. Screw the head in place and close the valve with a decorative body.
After the above steps, you can make sure that the faucet does not leak and the nerve-wrack rhythmic dripping of water into the sink has disappeared.
Photo gasket replacement instruction
In cranes with a rod locking mechanism, by analogy with valve devices, the most wear part is a rubber gasket. And although such devices are now difficult to meet in urban conditions, they are still actively exploited in summer cottages.
It is worth familiarizing yourself with the sequence of work on replacing the valve seal that blocks the flow of water:
Swivel Mixer Repair
Hinged (single-lever) mixers are widespread due to their ergonomics: you do not need to turn the valves for a long time, smearing them in the kitchen with fat and flour. Despite the external simplicity and elegance of the shapes of such cranes, the algorithm for their operation is quite complicated.
To increase the maintainability level of articulated mixers, manufacturers began to use a modular type of design: a special cartridge is installed inside the housing, which contains all the necessary mechanical filling.
Therefore, special knowledge to understand how to eliminate leaks in the articulated tap is not required: with most breakdowns, the entire cartridge is replaced.
The flow of water with the valve closed means a leak between the seat and the plastic or ceramic regulating parts of the cartridge. Some models can be tried to disassemble and clean, but the likelihood of returning the cartridges to serviceability and eliminating leakage is very small. To quickly replace the internal filling of the articulated tap, the following should be done.
The first one. We remove a decorative color cap cap. It serves not only to cover the bolt, but also indicates the position of the lever when applying cold and warm water.
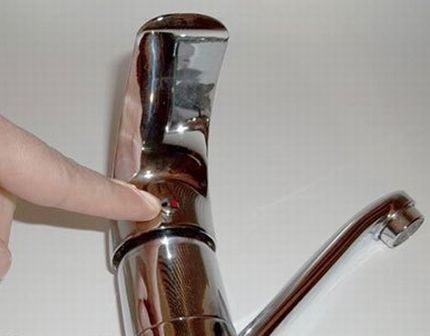
The second one. In the hole that opens, unscrew the fixing bolt that secures the lever to the cartridge.
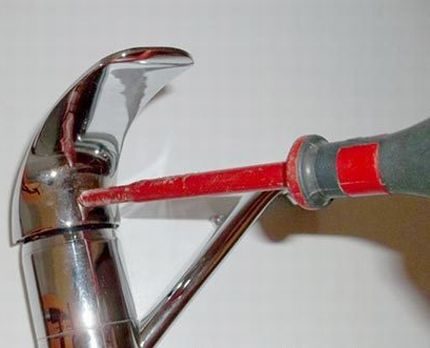
We remove the crane handle.
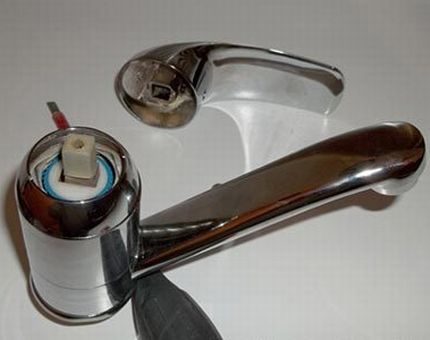
The third. The cartridge is closed with a decorative cover, which must be unscrewed by hand. Under the cover is a large circular nut, which is the main problem for those who want to change the cartridge on their own.
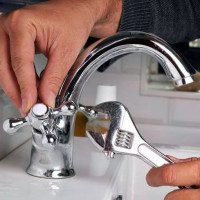
To unscrew this nut, an adjustable wrench with a clearance of 27-32 mm is required. Such keys are not in the back room of every owner, so you need to worry about their presence in advance.
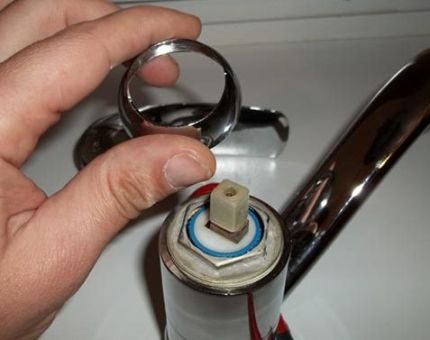
For convenience, the removed parts are best placed on a flat surface in this order. It is advisable to photograph the disassembly process so as not to get confused in the details during reassembly.
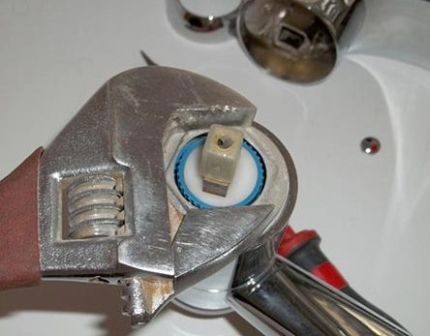
Fourth. After unscrewing the nut, the cartridge is pulled out and replaced with a similar new one.
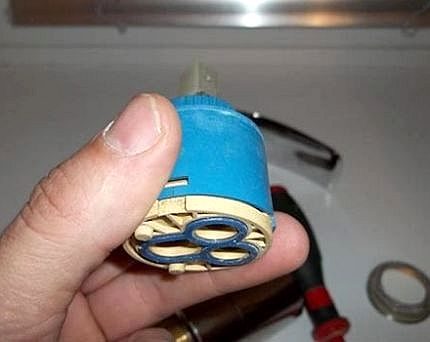
If you have saved packaging from the old tap, then using it in the store you can buy a suitable cartridge model in advance. If the type of mixer is unknown, you will have to repair the faucet in the morning or in the afternoon, so that after disassembling it you can manage to go to the store and buy a similar part.
The cartridge has special protrusions on the lower half that correspond to the dimples on the saddle. They are needed to fix the parts in a clearly defined position.
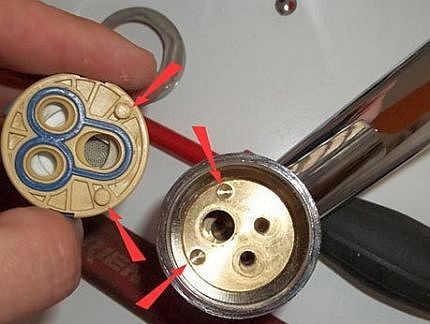
After installing the cartridge, the crane components are assembled in the reverse order.
If the cause of water leakage is microcracks or grooves on the saddle, then you can try to grind the metal surrounding the hole with a drill with a small grinding head. Large cracks are not repairable and are a clear sign that you need to buy a new mixer.
Detail on how repair ball mixer, you can find in the article we have proposed.
Leak at the base of the valve
A flywheel, also known as a valve, is designed to control the flow of water through the spout. The regulating head (axle box) is usually fastened to the body of the crane by a threaded connection and contains one or more o-rings to seal the interior of the mixer.
Below are two diagrams of the locking devices of a valve mixer in comparison with a single lever tap (right).
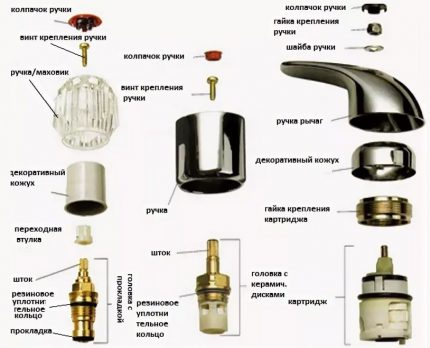
Flywheels are covered with decorative covers that are attached to the heads with a screw or bolt, hidden under a small cap.
Causes of valve leakage
The control head has a complex internal structure.
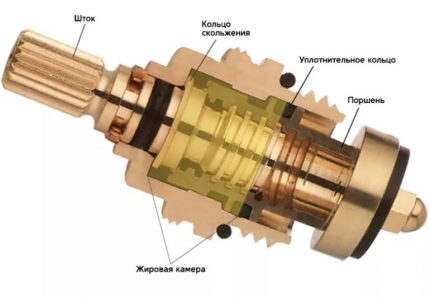
Water from under the valve cover may ooze due to such breakdowns:
- Insufficient level of head sealing:
- the crane box is not sufficiently pressed to the mixer body (in modern models);
- poor winding of the thread when screwing the head (in older models of cranes without o-rings).
- Damaged rubber gaskets or rings between the mixer body and the crane.
- Aged stuffing box packing. With this breakdown, leakage is observed with the tap open.
Before diagnosing the causes of valve leakage, it is necessary to shut off the total water supply in the apartment and remove the decorative covers from the flywheel.
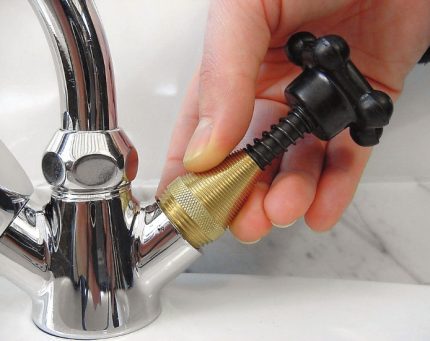
After gaining access to the adjusting head, open the water and determine the places where the water oozes. Then shut off the water again and proceed with the repair.
Troubleshooting Methods
It is necessary to consider methods of repairing the valve mechanism, given the place of water leakage.
Option one: water flows from under the rod.
If the crane has a non-separable adjusting head, then there is only one way out: to buy and install a new crane-axle box, there is no other way. However, most bona fide crane manufacturers typically insert maintainable heads into their products. If they have a stuffing box on top, then you can try to tighten it with a key and check for leaks.
When water flows with the gland sleeve clamped as much as possible, you can disassemble the head, remove the seal and try to replace it. In most faucets, the control valve boxes are standardized, but it is not always possible to find a new oil seal of the required design.
If it is not possible to repair the leaking head by replacing the stuffing box, then it should be replaced with a new one.
Option Two: water flows at the junction of the mixer head and body.
The simplest way to solve this problem is to press the head with a key to the mixer body. If the result of this action is negative, unscrew the crane and check the gaskets.
Perhaps, during the initial installation of the crane, they moved to the side or twisted, which eventually leaked. It is recommended that the o-rings be removed and reinstalled, and then screw the adjusting head back into the mixer.
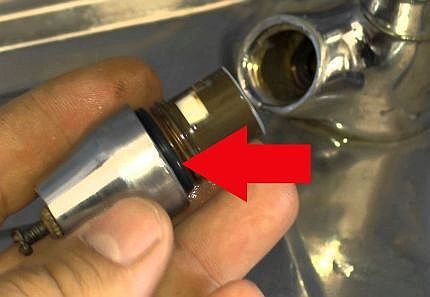
If the reinstallation of the gaskets does not lead to the disappearance of leakage, then their complete replacement is required.
Instead of rubber seals in Soviet cranes, tows of paint were often wound on threads. In case of leakage from under the valve in such mixers, you must first completely clean the head from the remnants of the seal, and then wind a convenient fum tape or the same tow lubricated with silicone onto the thread.
After that, tightly screw the head back into the tap and enjoy the lack of leakage!
Another cause of leakage in the gap between the valve and the tap may be the appearance of a small groove or scratch along the edge of the mixer housing under the gasket of the adjusting head. If such defects are found, then gently sand the entire annular surface until the scratches disappear, and then reinstall the crane box.
If, due to serious defects in the elements of the tap, it is impossible to stop the flow as described above, then you need to prepare the family budget for the purchase of a new mixer. And homemasters are advised to study the technology installation of the mixer on board the sink in the bathroom or in the kitchen.
Leaking at the base of the gander
Due to differences in the design of the valve and flag mixers, the causes of water flows at the base of the gander and the methods for eliminating these taps are different.
Leaking at the spout of the mixer tap
The shower hose and spout pipe (in common people - the gander) is attached to the body of the tap with a union nut, under which there is a rubber gasket. And if a faucet leaks in your bathroom, then the reason usually lies in the wear of this gum. Often, the gander has an additional 1-2 additional outer o-rings.
In order to repair a leak, in this case, unscrew the union nut and put in a new silicone or rubber gasket, and also replace the rubber rings if any. Of the tools for this procedure, you will need an adjustable wrench, as well as an awl or a small screwdriver to remove the old rubber gasket.
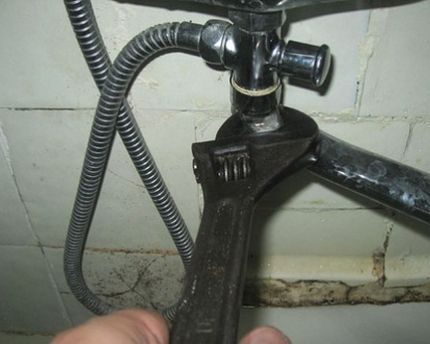
Gaskets must be stocked in advance.
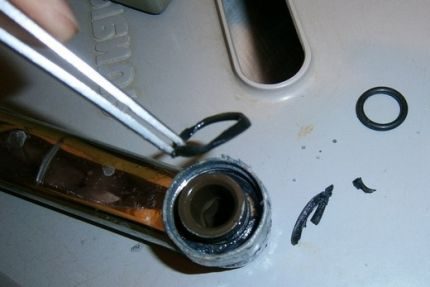
If you need to fix the malfunction quickly, but there is no suitable new o-ring, you can simply tighten the fum tape onto the thread and tighten the union nut with the cleaned old gasket.
Water can ooze at the base of the gander for another reason: over time, microcracks can occur in the body of the tap or spout, through which the water leaks. The solution to such a leak is only one - it is the replacement of the entire mixer.
To help independent plumbers, we presented a photo briefing on replacing the valve mixer gasket:
Leak at the base of a single lever mixer
To get to the glands of the base of the articulated tap, you must completely dismantle it by removing it from the sink. This procedure is not simple and long, therefore, we will consider it step by step.
The first step in repairing a water tap is to shut off the water in the house. After that, it is necessary to disconnect the flexible hoses from the supply pipe and open the mixer so that the remaining water escapes.
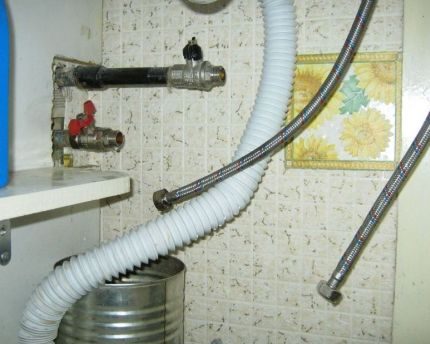
The second thing is to unscrew the fixing nut on the stud under the sink, remove the fixing bracket and pull out the tap along with the hoses.
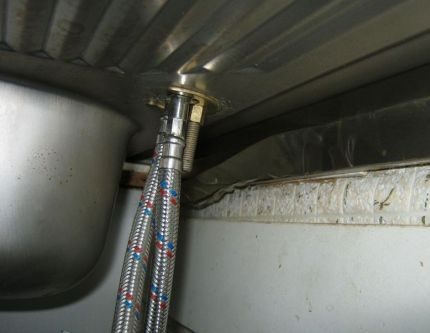
Then we unscrew the pin itself with a screwdriver, and disconnect the flexible hoses with the open-end wrench. If their fittings and rubber tube are worn out, it is advisable to buy new connectors or, at a minimum, replace the O-rings and gaskets at both ends of the hoses. In the fourth step, unscrew the threaded ring at the base of the tap, which holds the spout. Remove the gander.
At the fifth stage of repair, it is required to carefully examine and remember the location of the sealing rings and seals in order to put on the new parts correctly the first time. After that, remove the old gaskets, clean their locations and install new gaskets. It is convenient to clean the grooves with an ear stick moistened with water or oil.
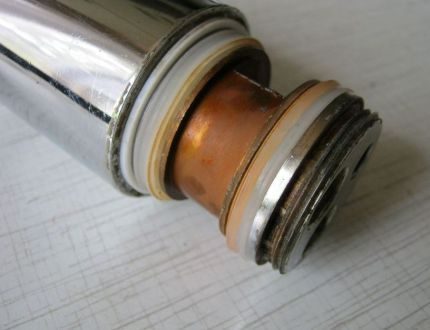
Silicone gaskets usually serve two to three years with active use. If you plan to use the crane for a longer period, then it is better to look in stores for ordinary rubber seals that will last several years longer.
The last thing you need to assemble and install back the constructor called "flag tap", not forgetting to put gaskets.
If the store did not find suitable gaskets in size, and in the standard repair kit they are not provided at all, you can eliminate the leak in the following simple way:
Now it remains only to collect the remaining parts of the mixer body and put the device in place:
After installing the mixer in its original place, you need to observe for several days that there is no leak at the base of the spout and under the sink. Once it is advisable to look at the joints after a long washing dishes.
If there is a leak under the sink and water flows through the connecting hoses, it will be necessary to re-dismantle the tap and eliminate the leak. We will discuss this problem in detail in the next section.
Leak at the junction of the inlet pipes
The flow of water at the points of connection of the mixer body to the water pipes or hoses can occur for three reasons:
- Worn seals.
- Crack in mixer housing or connection fitting.
- Incorrect installation of flexible hoses.
If during inspection of the repair site a crack of the mixer body is revealed, then you can immediately start to choose a new water tap, because it is impossible to repair this breakdown.
Options for eliminating other causes of leaks will vary for taps with flexible inlet hoses and at mixers into which water is supplied from the nozzles of rigid plastic or metal pipes.
Repair of leaking nozzles in the bathroom
The flow of water at the junction of the mixer housing and the nozzles built into the wall is eliminated similarly to the leakage of the valve mixer at the base of the spout, the instructions for the elimination of which are described above. In both cases, the connection of the two tubes is due to the union nut, under which there is a sealing gum.
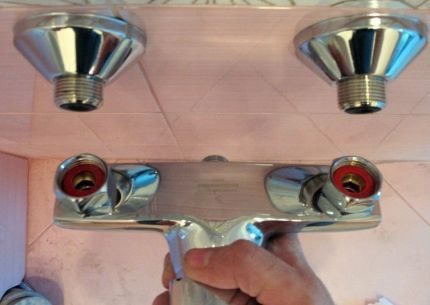
An important nuance of the gasket replacement procedure during the installation of a two-pipe mixer is the simultaneous unscrewing and tightening of both union nuts.
Otherwise, a skew will occur, which can result in a displacement of the gaskets and even a licking of the threaded connection. And damage to the threads of the nuts of an exclusive crane can lead, at a minimum, to the need to install home-made parts with an unsightly look.
Leakage elimination through inlet hoses
Consider eliminating the flow of water at the junction of the hoses and the valve body using the example of one of the most common mixer models.
First of all, it is necessary to block the water access to the tap and unscrew the flexible hoses from the water inlets. Then unscrew the valves of the mixer and drain the water from the tubes.
On the shell of the sink, the faucet is attached from below using a bracket pressed by a nut on the stud. It is necessary to unscrew the fastener with a key and carefully remove the mixer from the sink, pulling the hoses up through the hole.
In principle, you can not remove the tap from the sink, but unscrew the water hoses directly below. But hardly anyone will like to do gymnastic exercises in a limited washing space.
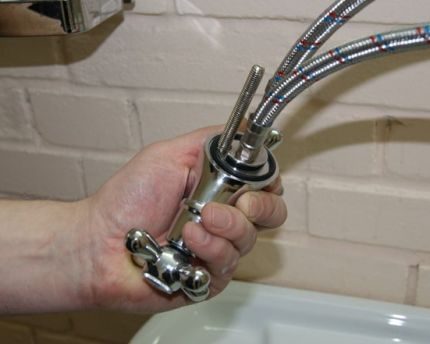
Next, you need to unscrew the hoses from the valve body with a key and replace the o-rings on the fitting, after having cleaned all the grooves with an awl and fabric.
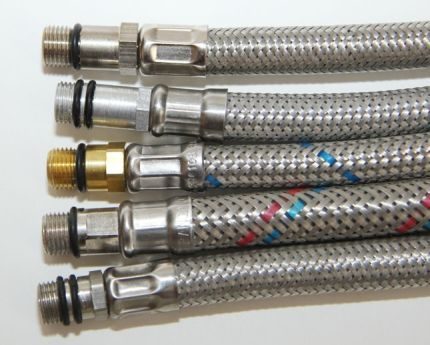
If the lead-in rubber tubes are worn out, it is better to buy new ones, because with the reverse installation there is a high probability of their complete rupture. Due to the diverse design of the fittings, you need to take old hoses to the store with you as an example.
After installing new rings or buying new hoses, you can mount the valve in place, following the reverse procedure. When tightening the hose fittings, it is very important not to pinch them tightly, because thin O-rings can twist or simply “smear”. Sometimes just enough to hold the hoses with your hands.
The main problem of mounting and dismounting the mixer is the limited working space. Often, long open-end wrenches are simply not available for loosening a nut. In such situations, you can lubricate the stud threads with oil and unscrew the nut with pliers.
If the mixer is connected with a rigid eyeliner, then most often it is replaced, with the features of which it will acquaint next article.
If all of the above actions were carried out correctly, then the flow should stop. Although sometimes you have to unscrew and tighten the hoses again due to the poor quality of the o-rings and their displacement.
Conclusions and useful video on the topic
Video clips will help to consider the internal structure of the faucets and facilitate understanding of how to eliminate the leakage of the tap.
Video # 1. Elimination of a leak at the base of the spout of a single lever tap:
Video # 2. Replacing the flexible hoses on the tap:
Video # 3. Dismantling and repair of crane boxes:
The information presented by us about the features of repairing faucets will always help a good owner to determine the reason because of which a tap is flowing and choose a method for fixing it.
Want to talk about how you yourself repaired the faucet in the kitchen or bathroom? Do you have any questions about the information provided? Please write comments in the block below.

 How to repair a faucet in the bathroom with a shower: causes and methods of troubleshooting
  How to repair a ball mixer: an overview of popular breakdowns and how to fix them
  How to change the faucet in the kitchen: remove the old faucet and install a new
  Instantaneous electric water heater on tap: selection tips + review of the best brands
  How to choose a faucet for the kitchen: types, specifications, an overview of the best options
  How much does it cost to connect gas to a private house: the price of organizing gas supply
  The best washing machines with dryer: model rating and customer tips
  What is the color temperature of light and the nuances of choosing the temperature of the lamps to suit your needs
  Replacement of a geyser in an apartment: replacement paperwork + basic norms and requirements
Everyone who uses low-cost faucets often has situations when they need to repair a leak. More expensive branded faucets also flow, but much less often. No matter how anyone tries to insist that we overpay only for the name, it is a fact that the more expensive is usually the better.
At home, the taps (valves) themselves usually leaked. And in such cases, I always went to the store for a new crane box. Yes, in principle, it can be disassembled and a tiny ceramic part can be changed (I have ceramic everywhere), but why? Crane axles are quite inexpensive, and the new one works many times better than a repaired one. Here cartridges have never been repaired. So far nothing is flowing (t-t-t), but I will re-read this article if all of a sudden. Added to bookmarks.
If water is dripping from a gander, then consider yourself lucky, you just have to change the cartridge. But if it flows from under the rod, then you have to tinker with it, because there can be many reasons. In such cases, a lazy plumber may suggest changing the entire mixer, but if you do the repair yourself and take care of your money, you can try to unscrew, clean, and replace the gaskets.