DIY LG washing machine repair: frequent breakdowns and troubleshooting instructions
LG's South Korean washing equipment is very popular due to its reliability and functionality. It contains complex technical units and simple details, which you can replace yourself. It is not necessary to immediately run to a service center after detecting a malfunction. After all, saving where you can not spend is always useful, right?
Those who want to repair the LG washing machine with their own hands will learn from us about the common types of breakdowns and methods of dealing with violations of the washing machine. With our help, independent repairmen will solve any technical problem without problems and difficulties.
In the article brought to your attention, the types of malfunctions that occur during the operation of LG machines are thoroughly analyzed. Options for their elimination are described taking into account the manufacturer's recommendations and design features. Visual videos and photo applications will assist in the development of a difficult topic.
The content of the article:
The principle of operation of the washing machine
What does a washing machine do? In fact, it fills the water inside the case, heats it and spins the drum, filled with dirty linen. This happens in a certain way, which ultimately leads to cleaning the laundry from contamination.
Now a little more. As soon as the washing program has been started, the first step is to open the water supply valve. Water flows through the dispenser into the tank.
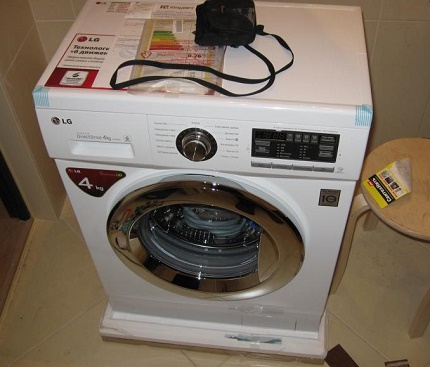
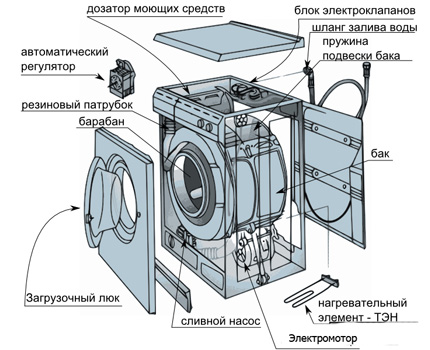
Important parts of the machine that you need to know:
- Dispenser - a box for detergents.
- Tank - a plastic container in which the drum and the heating element (TEN) are located. Water is poured into it.
- Pressure switch - He's a pressure switch. In washing machines, monitors the water level.
- TEN - tubular electric heater. Heats the water.
The pressure switch gives the go-ahead to stop the flow of water as soon as the required volume is gained. Then turns on the heater.Near the heating element there is always a water temperature sensor (thermostat) As soon as he reports that the water has heated strictly to the desired temperature, a motor comes into play that rotates the drum.
Toward the end of the wash starts to work water pump - this is most often called a water drain pump. It ends the “production cycle” of the washing machine and with it begins the analysis of typical malfunctions of LG brand machines.
Common types of breakdowns
The nodes of the washing machine are electromechanical devices that move under the influence of current. They work under load, they are exposed to tap water and temperature changes.
Here is a list of what might break:
- electric door lock;
- filling valve;
- pressure switch;
- TEN;
- temperature sensor;
- electric motor;
- speed sensor (“Hall sensor”);
- drum bearings;
- water pump;
- electrician (wire connections);
- gaskets and hoses.
If the machine has drying and steaming functions, a few more items are added: a steam generator, an air heater, a fan, an air temperature sensor.
But the most popular reasons for contacting service centers are the failure of the pump, heater, flooding valve, pressure switch, electrics and bearings.
Generally washing machines LG very reliable and, in comparison with other brands common in Russia, break much less often.
Diagnostics and repair of the main components of the machine
Washing machines do not fundamentally differ from each other. The descriptions given here will help you navigate their device (even if your machine is not LG).
The first stage of repair work is diagnostics. Do not start replacing parts without fully verifying the cause of the breakdown. The failure of a particular element is signaled by special signs. New generation machines have a system hint codesthat help determine the location and cause of the failure.
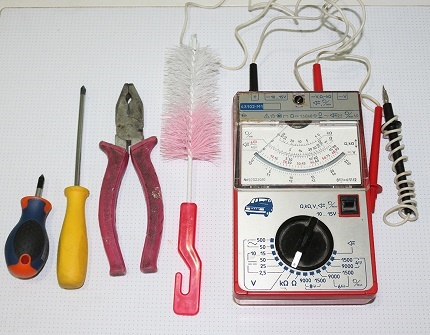
For most operations, a Phillips screwdriver will suffice. Pliers and wire cutters will help in some way, but somewhere you will have to use keys and heads for 10 and 14. For more complicated repairs (for example, replacing bearings), more cunning devices will be needed.
To facilitate the task, it is recommended to take paper tape and markers. Before disconnecting the wires, label them with tape from multi-colored numbers. Take a picture so that later it is guaranteed to assemble correctly.
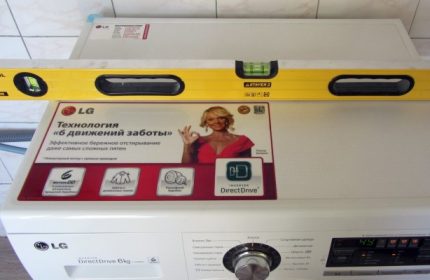
Most nodes and individual devices of the washing machine are not repaired. For example, when it burns out TEN, it needs to be changed entirely. To find a suitable model for sale, find out the model number of your machine (“Model No”) And its serial number (“S / No" or "Serial no”). They are written on a sticker or plate. Look for her on the case: under the door of the drum, behind, on the side.
Before installing a new part, be sure to turn off the plug again. Many nodes operate on deadly 220 volts.
Replace the drain pump according to the rules.
The washing machine does not drain, the display shows an error code “OE”. Everything is simple - this is a pump, and it did not necessarily break.
Usually, during the discharge, a characteristic sound is clearly audible - the impeller of the pump rotates. You can see it at work without even taking it apart.To do this, you need to open a large round cork - it is located in the lower right corner, under the hatch or plastic panel on the latches. Be careful: water will flow!
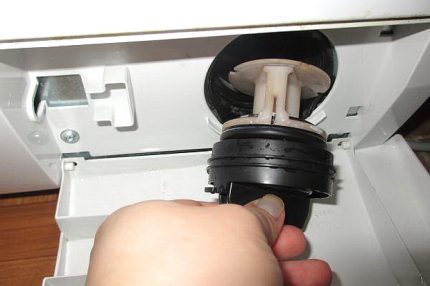
Even if the impeller does not spin, it could simply become clogged. First thing drain the water. Near a large round cork, you can find a thin tube closed by a small cork. Substituting a large flat container, gently pull out the tube and open it. And be patient.
Another way to drain the water is to lower the drain hose to floor level. Most likely, it is fixed with clamps on the back wall. When the tank is empty, you can safely open the cork of the pump and get everything extraneous that you find there.
It is possible that all problems were associated only with clogging of the drainage system. It will be necessary to clean it corny, which will help a detailed video instruction:
If the pump nevertheless breaks down, you will have to disassemble the car a little:
- Remove the plug from the outlet.
- Take out the dispenser. It will be necessary to tilt the machine, and usually water remains in the dispenser, which can spill.
- Remove the bottom plastic panel. It is fastened with two self-tapping screws and latches around the perimeter.
- Tilt the machine or place it on your left side (the pump is usually located on the right).
Now you can test the pump multimeter and take it off. Even if good electric chainThe pump could wear out mechanically. In such cases, the machine does not always agree to drain the water, and the impeller can hang on its axis.
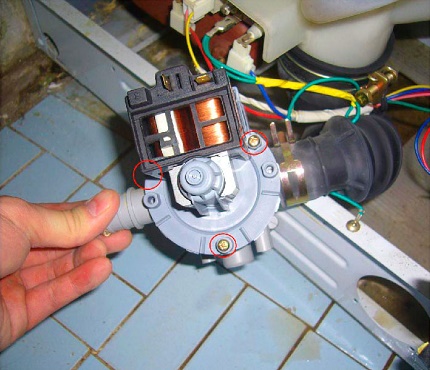
So, you have diagnosed a pump malfunction or are not sure if it works. You can take the device to a household appliance service to ensure that it is working properly.
If you are sure that washing machine pump defective - change, for this:
- Remove the dispenser - there may be water left in it.
- Remove the bottom plastic panel: unscrew the two screws and gently pry the edges, starting from the top. Better to do it with a chisel than a screwdriver - there will be less damage.
- Put the machine on its left side.
Wires and hoses are connected to the pump. The wiring terminals are pulled out by hand (do not forget to tag and photograph them). To remove the hoses, you need to unclip the clamps with your fingers or pliers. When everything is turned off, unscrew the three self-tapping screws around the filter plug.
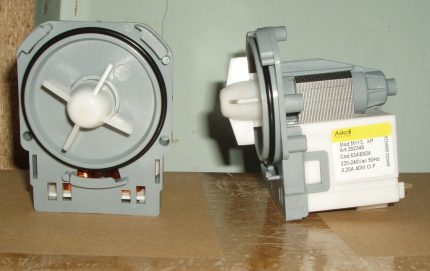
You may not find the exact same part for sale. But there are very few varieties of drain pumps, and almost every one fits into dozens of different models of washing machines. Perhaps the easiest way is to contact the nearest service for a new part.
Before installing a new pump, clean dirt and deposits. They can greatly affect the life of the impeller.
It will be more convenient to first screw the pump with screws, then connect the hoses and wires. Remember to close the cork. Put the machine in place and start “idle” some shortest cycle, for example, “Rinse and spin" After making sure that everything works, you can assemble the car completely.
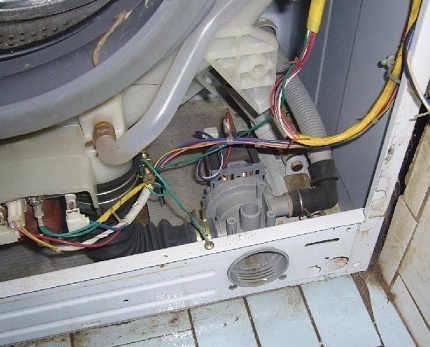
Installing a new water heater
Error code - “HE”. Another sign is that the door glass is cold, while according to the program the water should be 40 ° C.
To make sure that water heating device - TEN defective, you need to remove the back cover, for this you will need a Phillips screwdriver. First, unplug the plug, then unscrew the four screws and pull the lid slightly up.
The heating element is located at the very bottom of the tank, three wires are suitable for it. The middle one is grounding, and the extreme ones are power, 220 volts. Disconnect these terminals and check the heater. multimeter.
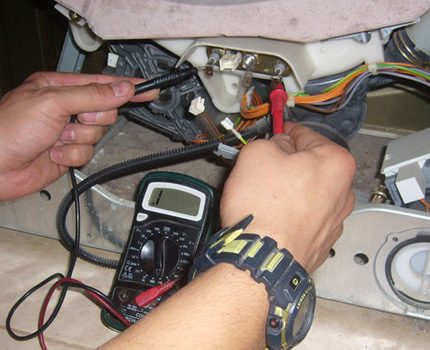
Disconnect the wires. To extract TEN, you need to unscrew the nut in the middle and “drown” the stud. Using a screwdriver, pull out the heater as far as possible.
Now remove the rubber seal by prying its edges with a flat screwdriver. Do not touch the edges of the hole! The slightest notches will break the tightness.
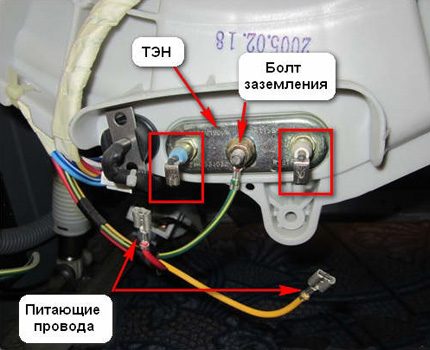
The new heating element is sold complete with a seal. Buying it, you will surely pay attention to the lack of an internal side with an elastic band: let this not bother you. It formed over time, as the seal was sandwiched between the heater and the inner plate.
Your heater may have a built-in temperature sensor. If it is working, then changing it is not necessary. There is a bracket inside the tank - the heater must get into it. Having inserted it to the end, spin the drum by hand. If a scraping sound is heard, the heater passed above the bracket.
There is also a danger of overshot, and then the tank will suffer from high temperature. Now tighten the nut, but without much effort. Pour water into the tank. You can directly through the drum, for example, from the shower. Make sure that the seal does not leak, if necessary, tighten the nut slightly.
Professional guidance on the replacement of the heater is presented in the video:
Jam Valve Repair Options
Problems with the intake valve can manifest themselves in different ways.
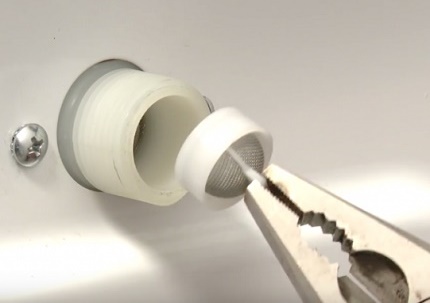
Problem # 1. Water is collected slowly, the powder in the dispenser is not completely washed off. Perhaps the weak pressure of water is to blame. If not, then the filter is clogged.
- Shut off the water supply to the washing machine.
- Unscrew the inlet hose directly at the inlet to the machine.
- Use a pair of pliers to remove the filter.
Most likely, the plastic mesh is clogged. It can be cleaned with a toothpick under running water.
Problem # 2. Water does not accumulate. Error code may be displayed. “IE”.
First check the filter as described in the previous paragraph. If cleaning does not help, you need to get to the valve and check it with a multimeter. To do this, unplug the plug and remove the top cover - it is fastened with two screws on the back. Having unscrewed them, slide the cover a little back, and then it will be removed without effort.
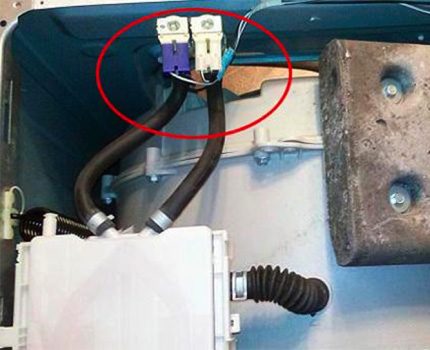
Make sure that the power cord is not in an electrical outlet. Now disconnect the terminals from the valves. Use a multimeter to check the resistance: it should be within 2.5 - 4 kOhm.
Problem # 3. The machine doesn’t wash, but the water rumbles inside. It makes no sense to check the electrical part of the valves - this is mechanical wear. A valve is not a very expensive part; it is usually not repaired. Just in case, mark the wires and take a picture of how it was. Replacement Procedure:
- Remove the plug from the outlet (most often 220 volts are supplied to the valves).
- Shut off the water.
- Remove the top cover by unscrewing the two screws on the back and sliding it a little back.
- Disconnect the wires and hoses from the valves.
The valve is fastened with self-tapping screws or special latches.In the second case, you need to crank it, while simultaneously pressing on the plastic bulges from the outside. There should not be any difficulties with the installation of a new spare part.
DIY pressure switch replacement
When out of order pressure switch, the machine is collecting too much water. It happens that water is constantly collected and simultaneously drained. Sometimes the breakdown of this sensor is manifested in poorly pressed laundry. Display may show error code. “PE”.
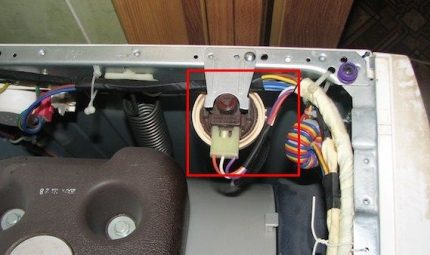
It is easy to remove this sensor. Remove the plug from the outlet, remove the top cover by unscrewing two screws on the back and sliding it a little back.
It is fastened with one self-tapping screw. First disconnect the terminal, then remove the sensor, and finally disconnect the hose from it. pressure switch, you need to blow into it. In good condition pressostat you will hear a click. Install new pressure switch in reverse order.
Recommendations for repairing electricians
The hardest thing to diagnose is a wiring problem. The electrics of the washing machine are responsible for the operation of all systems, and disturbances in contacts lead to a variety of consequences.
If you are not sure what exactly failed, check the electrician. Unplug the power cord, open the back and top covers. You can remove the bottom plastic panel if there is a problem with the drain.
Systematically inspect all wires and their connections:
- The terminals should be clean and shiny.
- The color of the insulation of the wires should be bright and uniform.
- Water should not get on wires and contacts.
When inspecting the inside of the washer, you may find wiring problems.
It can be:
- oxidized contacts (white or green rough coating);
- darkened or whitened insulation;
- partially destroyed, cracked or burnt insulation;
- wet contacts.
If water gets on the contacts, wipe or dry them. Be sure to repair leaks. Oxidized terminals are not enough to strip. Perhaps moisture constantly gets on them, so you have to find and eliminate the cause.
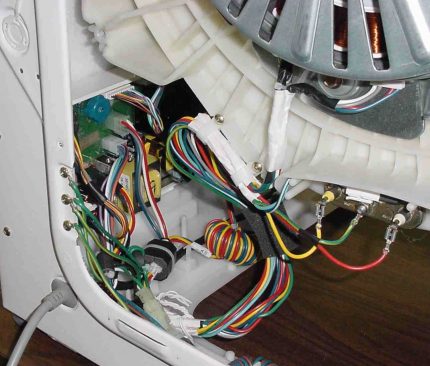
Oxidized contacts are best replaced. If possible, find the opposite end of this wire and replace it whole. For such repairs, you will have to make friends with a 60-watt soldering iron. As a temporary measure, you can strip the contact, but re-examine after a couple of weeks.
If the insulation is broken, the wire definitely needs to be replaced. Darkened insulation is also a sign of poor contact and, as a result, overheating of the wire. Sooner or later, the insulation will melt, a short circuit and fire can occur.
Bearing Replacement Instructions
These are perhaps the biggest hard workers in the washing machine. They carry the entire load of rotatable wet laundry and the weight of the drum. A damaged bearing can be heard immediately: an unpleasant hum appears, especially loud during spin.
The bearings are protected against water by an oil seal, which can also wear out. In this case, the water will leak to the bearings, and then they will have a slow but sure death. Buzz is a very reliable indicator. As soon as it appears, get involved in the repair without delay. Procrastination can lead to more costly consequences.
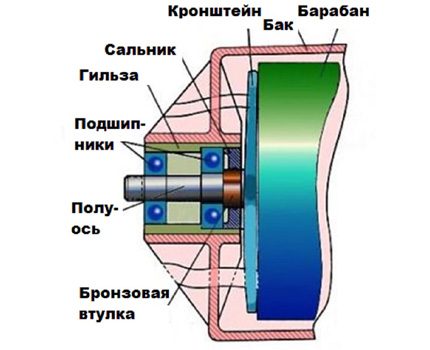
The most complicated operation described here is bearing replacement. But ignoring the buzz, you run the risk of making things even harder.
Due to spoiled bearings, the drum rotates with exertion. The bearings begin to break the tank and the power element of the drum - the cross. There is a possibility that the bearings began to rust due to wear of the stuffing box. In this case, water from the tank will flow to the engine.Imagine the consequences.
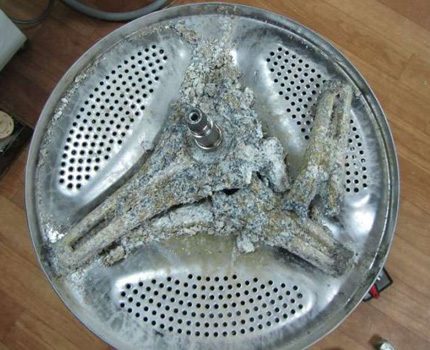
To replace the bearings, you need to disassemble almost the entire machine. The point is to remove the tank, disassemble it and remove the drum from it.
In addition to screwdrivers, you will need to work:
- head for 10;
- key or head at 14;
- pliers;
- nippers;
- clamps for wiring (polypropylene ties);
- simple silicone sealant (not glue!).
Gloves and a flashlight will also help a lot.
Unplug the power cord. Remove the back wall and disconnect the wires going to the motor and heater. Remove all the fasteners that secure the wires to the tank, cut the clamps with wire cutters. The tank itself hangs on two springs and is supported from below by two shock absorbers.
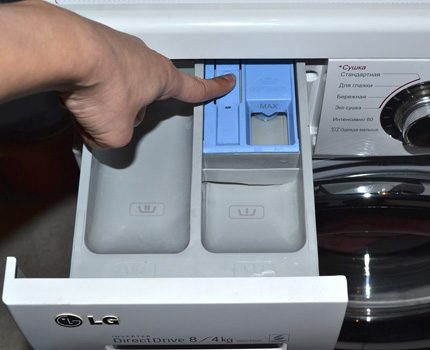
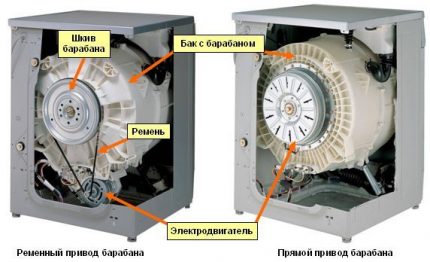
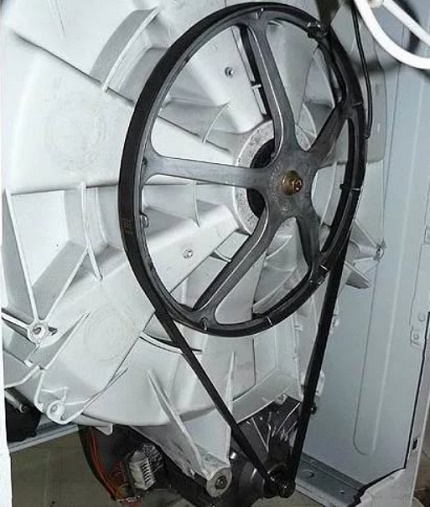
Most likely you have a direct drive car. So you have to remove washing machine motor. Loosen the center screw while holding the drum by hand.
Be careful not to cut yourself on the edge of the case. Remove the rotor (moving part of the motor), then unscrew and remove the stator (respectively, the fixed part).
Around the hatch into which the laundry is loaded, there is a large elastic cuff. A spring clamp surrounds her. Find this spring and pick it up with a screwdriver and remove the clamp.
After dismantling the clamp, proceed as follows:
- Now you can remove the front panel. It is held by screws on the upper and lower edges. Pull the panel up a bit. Disconnect the wires going to the lock.
- Remove the pipes from the bottom (water may remain inside!) And the thin hose going up to the pressure switch.
- Remove the jumper on which the front edge of the top cover rests.
- Remove the dispenser and filler valve.
- With your head 10, unscrew the balances - one on top and two on the front.
It remains to disconnect the shock absorbers. They are attached with plastic pins; press the spring latches on the pointed ends of the pins and remove them (you can use pliers).
Make sure you disconnect everything. Now you can raise the tank and unhook the springs. Gently pull the tank forward. Do not forget that the water level control pipe is screwed on from below, which can be accidentally broken. For peace of mind you can remove it.
Further it will be more convenient to work on the table. At this stage, you need to disassemble the tank and remove the stuffing box and bearings from it. The tank consists of two parts, twisted by screws under the head by 10. Disassemble the tank.
The drum is simply removed from the rear half of the tank without much difficulty. Next, we need only the rear half (forecastle). When working with it, remember about the heater - do not bend or break it.
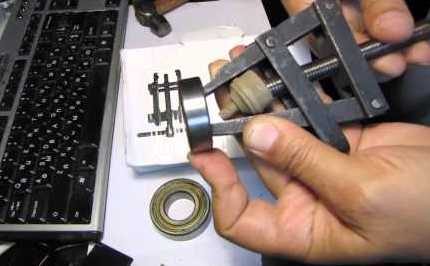
In the center of the forecastle, on the inside, you will see an oil seal. It must also be replaced. It will not be difficult to pull it out, using something as a lever (for example, a flat screwdriver). Lay the forecastle with its outer side up and insert the punch through the outer bearing - first we knock out the inner one.
Beat it carefully! If the bearing is skewed, it can damage the forecastle. Shots should not be strong. Alternate places of impact according to the principle of “crosswise”: first strike on the left edge, then on the right, then on the top, then on the bottom, and so on in the same order. Make sure that the bearing comes out smoothly, without distortions.
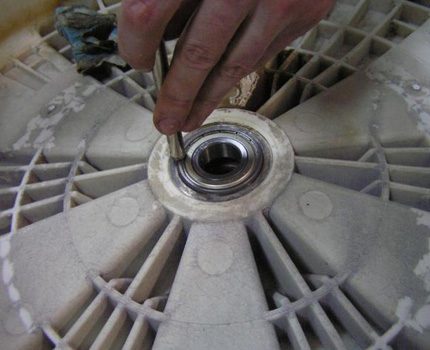
The external bearing is knocked out according to the same principle, only the forecastle must be turned over and propped up so that the bearing “hangs” above the table.
Installing new bearings and packing requires even more caution. You can hit only on the outer ring of the bearing. Using a punch, constantly check if the bearing is skewed.
Comprehensive instruction on replacing bearings with all the nuances will present the video:
Putting a new oil seal should also be careful - it is easy to bend. Do not try to straighten it, it is better to buy another one.
The slightest flaws in the installation of these parts will lead to leakage - water will fall on the bearings and then on the engine. Before assembling, try to clean the axis of the drum. Do not scratch or sand it.
The drum should fit easily into the bearings. Before assembling the tank, apply silicone sealant to the joint. Connecting the half tanks, make sure that TEN hit the bracket intended for him. Do not tighten the screws with all your might - this is not necessary. Thanks to the sealant, the connection will be quite reliable.
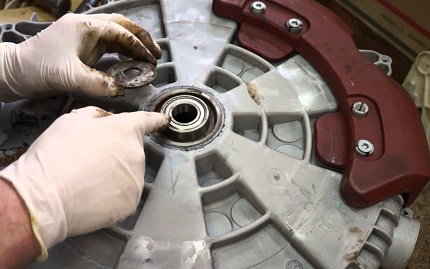
Screw the water level control tube to the tank. Then you just have to assemble the car. There should not be any difficulties. It is more convenient to work in this order:
- Hang the tank on the springs, attach the shock absorbers.
- Connect the hose pressure switch and fix it on the tank. The “extra” hose length should remain at the top.
- Install the counterweights.
- Attach the lower branch pipes.
- Screw the motor stator, connect the connectors to the stator and the heating element, secure the wires with clamps and brackets.
- Install the dispenser and the filler valve, connect the nozzles and wires.
- Screw the upper front jumper.
- Install the large front panel by pre-connecting the lock connector.
- Pull the edge of the cuff and put it on the side around the hatch. Put on a collar a collar.
- Install the engine rotor (or pulley). While tightening the center screw, hold the tank by hand from the front.
- Connect the wires to the top panel and install it.
Check again if everything is connected and fixed.
Before installing the remaining panels, you can run a short “idle” program to check the tightness of all connections. Once the machine is in place, align it with the level.
Conclusions and useful video on the topic
Replacing parts in the washing machine is a responsible matter. To take into account all the nuances and perform the work “excellently”, we suggest studying useful information on the nuances of assembling and disassembling the LG typewriter presented in the video:
So, you have familiarized yourself with the most common malfunctions of LG washing machines. Repairing them with your own hands is not always easy, but quite possible. Give it a try! Good luck in the repair!
Please leave comments in the block form below, ask questions and post a photo on the topic of the article. Tell us about how you repaired the washing machine with your own hands. Share useful information and technological nuances known to you that are useful to site visitors.

 Do-it-yourself washing machine repair: an overview of possible breakdowns and how to fix them
  DIY Samsung washing machine repair: analysis of popular breakdowns and repair tips
  Do-it-yourself Indesit washing machine repair: an overview of common problems and how to fix them
  Bosch washing machine errors: troubleshooting + recommendations for resolving them
  Samsung washing machine errors: how to understand the malfunction and repair
  Indesit washing machine malfunctions: how to decrypt error codes and repair
  How much does it cost to connect gas to a private house: the price of organizing gas supply
  The best washing machines with dryer: model rating and customer tips
  What is the color temperature of light and the nuances of choosing the temperature of the lamps to suit your needs
  Replacement of a geyser in an apartment: replacement paperwork + basic norms and requirements
Repairing a washing machine in a workshop was very expensive for our friends. Therefore, when ours broke down, my wife was in a panic at first from the fact that unforeseen expenses were planned, and then from the fact that I was going to repair it myself, although I had never done anything like it before. But the typewriter is 10 years old, and I decided to practice it, suddenly what - it's time to buy a new one. And she stopped heating the water, and I assumed that the ten was out of order. In short, nothing complicated happened, I replaced this heater, and the machine works again. And the wife was already dreaming of a new one.
And I, too, used to carry broken household appliances to a repair shop, and now I’m “going” to the Internet for a guide to action. I learned how to repair our bread machine, in which the sore spot is a graphite sleeve. Wears out quickly from the constant rotation of the mixer. By the way, I also order bushings on the Internet. The electric kettle also had to be reanimated.
I think if I have to repair the washing machine, I can do it too. It would be a desire. How did we live without the Internet before? And now we constantly learn something new. Live and learn.
Thank you so much. Helped a lot. They did not write a key on the 17 end to remove the drum and how to release the latches on the electrical connectors (especially under the engine rotor).
I really liked it. Cool told, shown. Thank. I have one question for you: the drum rotates by hand easily, without extraneous sounds, and when I turn on a quick wash or rinse and spin, water is collected with a turn of the tank. The tank first rotates, and then begins to stumble. That one way, that the other, and ultimately failure. 2 super rinse and intensive wash lamps light up and blink. After restarting, I press the spin button. I turn on the start, and the water is pumped out perfectly. I have a LG 5 kg washing machine with direct drive.
During washing, when switching to another mode, rattle and extraneous sounds occur
Hello. My washing machine outgrew heating water, I realized that it was time for me to TEN. I did everything, as shown in the video, all the rules. But I ran into a problem: he still does not heat the water. Can you advise something?
Hello. Washing machine LG 6. After the move, it stopped turning on. When the START button is pressed, the indicators do not turn on, the clicks of the relay are periodically heard. The red indicator on the control board is on. What could it be?
I have had. The relays click, but there is no drum rotation. Malfunction in the electronics unit. All power circuits are all solid! To get to the installation, I had to cut out the bottom of the plastic trough with the printed circuit board and clean the entire compound. Each output was stripped to a brilliance and then tinned. For a year now, everything has been working fine. Typewriter LG WD-8050F
I am looking for a service manual for washer LG WD-1014C. And it would be nice to wiring diagram. Maybe someone will help.
Hello. There is no technical possibility to check the profitability of the file now, but try this https://yadi.sk/d/j1xf7zDEfqxrLw
Also try asking the appropriate question here. https://www.lg.com/en/support/support-product/lg-WD-1014C
There was a se error, the Hall sensor failed, the drum twitched and did not rotate. He removed the sensor, poured out the glue, burned out two 680 Ohm resistances, stood in parallel, soldered, filled with rubber sealant, put it back, everything works like a clock. Machine with direct drive, 9 years from the date of purchase.
The pump stopped working, I could not determine the cause of the failure to the end - either the wiring, or the pump itself. I would like to know what voltage is coming to the pump, constant or variable, and what voltage?
Variable, 220V.
LG WD80164 NP: turn on, select the program, start ... and then the light music begins, the indicators go off cyclically and the indicators light up again, after the lock has been activated, the 75 Ohm resistor in the triac circuit that supplies power to the lock burns out. I suspect current protection is triggered.
Question:
1. What resistance should the heater have on the lock.
2. What else could be the reasons for this behavior of the machine?
where to get an electric circuit on it ???