Ventilation pipes for the roof: tips for choosing a pipeline + installation instruction
Each owner of a private house at least once faced with troubles, the cause of which was an imperfect ventilation system. Agree, living in a house with a musty smell from moldy walls, or condensate streams on pipes and glasses is not very comfortable.
In order to avoid problems with the ventilation system, it is necessary to think through each stage of its construction, from the basement to the highest point above the roof, before building a house. Some of the shortcomings can be eliminated in the already built building - for example, you can replace the air duct or install a deflector.
In this article, we will look at how to choose ventilation pipes for the roof and install it correctly, as well as give some tips on improving the protective functions and traction. We hope that our recommendations will be useful for solving problems with ventilation on our own.
The content of the article:
General requirements for ventilation pipes
Ducts in the ventilation system occupy a significant part. Through these communications, the withdrawal of used air to the outside or, on the contrary, its supply to the premises is organized.
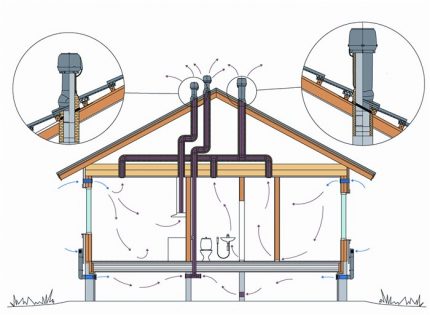
The ventilation system is installed for years, therefore, special requirements are imposed on pipes and other elements, and the installation process is subject to the rules.
We will consider several important points regarding air ducts in the photo gallery:
If you decide to arrange the outlet of the ventilation pipe on the roof yourself, then we recommend two options: galvanized steel or plastic. Both options are presented on the market of ventilation equipment in large numbers, from standard half-meter products to pipes of increased length.
For self-production, sheets of thin galvanized steel are usually used, which is easy to process with improvised tools. It is suitable for installation on the roof according to its characteristics, while creating a pipe, adapter and "fungus" is inexpensive.
Installation instructions for roof ventilation
From how you do vent pipe outlet on the roof, depends on the functionality of the hood itself, and the condition of the attic. We recommend purchasing advance-through elements designed for a specific material - flexible or metal tiles, profiled sheets, slate.
We will consider how best to perform installation on the roof of ventilation pipes so that the system works with maximum performance.
Stage # 1 - preparation of materials and tools
If you are going to work on the roof yourself, be sure to take care of comfortable clothes, gloves and shoes, pick up stairs for lifting and moving along the roof, and also prepare a safety cable for your own safety.

You will need:
- ventilation tube;
- factory or homemade passage unit;
- thermal insulation material;
- sealants and sealant;
- hammer drill or drill;
- jigsaw;
- Screwdriver Set;
- scissors for metal;
- marker for marking;
- screws or anchors.
The passage unit is selected taking into account the type and inclination of the roof.
There is a large selection of ready-made assemblies for standard diameter pipes on sale - we recommend using them.
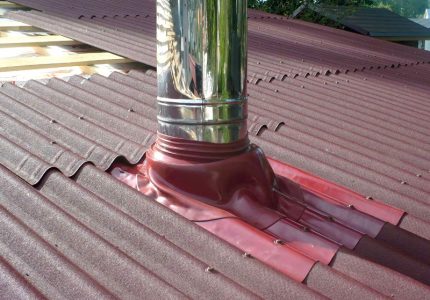
For a more solid fixation of metal products, anchor fasteners are used, but plastic ones can be mounted on self-tapping screws.
Stage # 2 - selection of the ventilation outlet
The place where the pipes exit is thought out, making up the project for the house. But sometimes you have to lay additional channels and act when the arrangement of the roof is completed.
When choosing an exit point, they are guided by the documentation of SNiP 41-01-2003, SP 7.13130.2009, and when choosing the height of pipes for sewage, they are guided by recommendations SNiP No. 2.04.01.
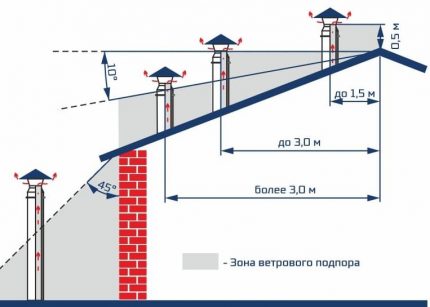
It is believed that on a flat roof the height of the pipe should be at least 0.5 m, and on a pitched roof it should be placed at a distance of up to 1.5 from the ridge, while it should also protrude about 0.5 m above the ridge.
If located nearby chimneys, then the hood is placed at the same level relative to the ridge, but it should be slightly below the chimney.
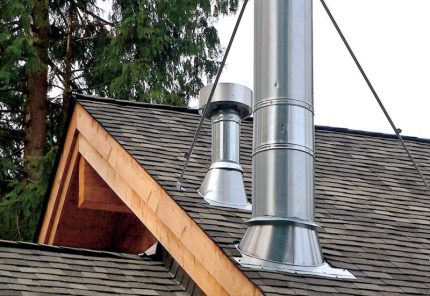
If the location is not selected correctly, noise or humming from air moving jerkily may appear in the duct. Have to install resonators or additional risers.
Stage # 3 - opening a hole in the roof
Having chosen the installation location of the pipe, it is necessary to make a hole for the passage element. If the product is factory-made, then it is completed with a special template: it should be attached to the roofing and circled with a marker. When attaching a homemade product, you need to focus on the dimensions of the lower part of the assembly.
Then remove the layers of the roofing "cake", starting from the top. The most difficult to work with a metal coating.
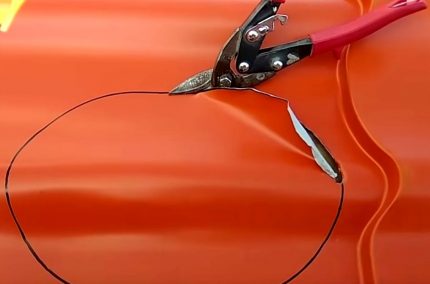
An inaccurate cut must be leveled with pliers - the edge should be smooth, without bends and deformations.
Under the roofing there is a crate. If the boards are 100 mm, then there is a chance that the pipe will fit between them. But if the boards are wider, for example, 150-200 mm or installed at narrow intervals, then for the installation of the pipe it will be necessary to cut fragments. An unnecessary section of the board is cut with an electric jigsaw or gradually drilled with a screwdriver.

Under the crate is a waterproofing layer. Along with the factory-made junction units, the system includes hydraulic locks designed specifically for installation on a membrane. They protect both waterproofing and insulation from water leakage from the roof.
We proceed in order:
- Put a water seal on the membrane.
- Marker circle it along the inner contour.
- Cut a hole in the membrane along the contour.
- Apply sealant to the water seal.
- We install a water seal in the hole, piercing the surrounding membrane with pins-holders.
- We fasten the device with screws to the batten boards. To do this, it is equipped with special "ears".
Seals and other elements may be included with transition nodes — they must be installed according to the manufacturer's instructions.
Stage # 4 - installation of the transition unit and pipe
First, set the pass-through element. To do this, apply it to the hole, find the correct position and mark the border with a marker.
Then along the edge of the hole and on the flange grooves we put a sealant, we press the passage unit to the roofing and fix it with screws. We recommend that you first fix two side screws - at the extreme points, and then all the rest. Try to ensure that part of the self-tapping screws is included not only in the tile, but also in the crate - so the fastening will be much stronger.
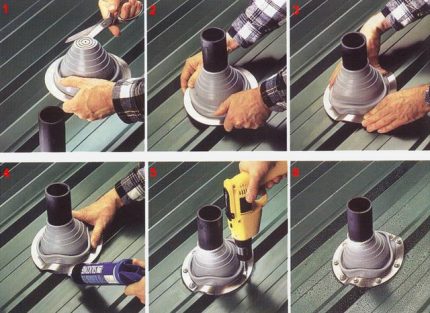
If, after fixing on the self-tapping screws, a sealant protrudes along the edges of the flange, this is not scary - so the junction will be even more tight.
When the sealant hardens, you can put the pipe. For factory products, there is a pipe inside that matches the diameter of the duct. It is simply inserted inside the passage assembly, while on the outside there is an expanded compacted part.

From the inside, from the attic or attic, let down air duct. It is either joined directly with the roof pipe, or connected via a transition flexible element, if the pipes are not located on one axis.
How to protect the ventilation duct?
It is easy to see that the ventilation pipes rising above the roof differ in their design. The fact is that some of them are not equipped with either a “fungus” or a deflector. These are pipes for sewerage service.
The air in the sewer pipes is always warm, so any elements installed on top will be covered with ice during the winter period, as a result of which the pipe will simply stop working
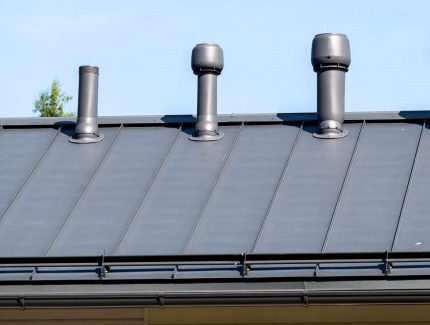
But other ventilation ducts require protection. To do this, a device is attached to the upper part to prevent the entry of street debris into the channel: dry leaves, branches, dust, sand. The protective element bears various names - “fungus”, cap, weather-vane, cover, “umbrella”.
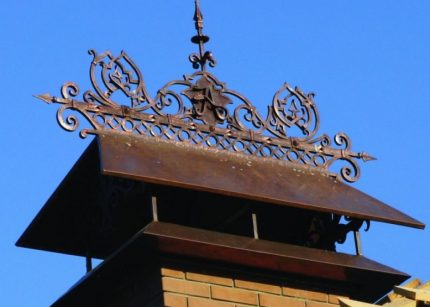
If you yourself want to make a "fungus" - it is not difficult. You will find video assembly instructions at the end of the article.
How to increase traction in the duct?
Duct performance can be improved by deflector, which is also mounted on the pipe and at the same time is a protective element.
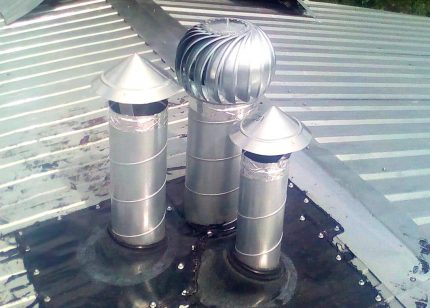
The principle of operation of the deflector is built depending on the strength of the wind. The built-in diffuser cuts the air flow and creates a low pressure area, which increases traction inside the duct. It is estimated that installing a deflector increases ventilation efficiency by 30%.
Modern devices have a decorative appearance and do not spoil the overall appearance of the roof after installation. You can install the deflector yourself.
Conclusions and useful video on the topic
Installation of pipe on corrugated board:
Detailed video instructions for the manufacture of the "umbrella":
Practical experience in installing a ventilation pipe on a roof from Ondulin:
The ventilation pipe on the roof is the same necessary element of home improvement as a chimney. Its functionality is completely dependent on proper installation. When installing, try to adhere to the requirements of SNiP, the manufacturer's instructions and safety rules.
If you correctly fix the transitional unit and install the pipe, the tightness of the roof will not suffer, and the ventilation system will work properly and create a favorable microclimate in the house.
Have questions, find bugs or want to supplement the material with valuable information on the topic of the article? Leave your comments, share experiences, ask questions - the contact form is located below.

 Adjoining the roof to the ventilation shaft: arrangement of the passage of the ventilation unit through the roof
  Roof ventilation from a profiled sheet: recommendations for design and installation
  Ventilation of the roof ridge: types + installation manual for ridge strips and aerators
  How to install a hood above a gas stove: step-by-step installation instructions
  Ventilation in the bathroom in the ceiling: arrangement features + installation instructions for the fan
  Ventilation pipes on the roof of the house: arrangement of the exhaust outlet through the roof
  How much does it cost to connect gas to a private house: the price of organizing gas supply
  The best washing machines with dryer: model rating and customer tips
  What is the color temperature of light and the nuances of choosing the temperature of the lamps to suit your needs
  Replacement of a geyser in an apartment: replacement paperwork + basic norms and requirements