How to make a floor drain for a shower under a tile: a guide to construction and installation
Independently equipping hygienic facilities in the country, in a house, apartment, we often try not to save, but to remodel the space for personal requirements. Therefore, we often choose not ready-made offers, but put a shower ladder in the floor under the tile and build a unique shower cabin. With all the desire to achieve the perfect result, not all of us know how this work is done. Do you agree?
We will share with you all the subtleties and nuances of a shower unit without the usual tray and standard designs. We will tell you about the types of plumbing ladders, the guidelines for their choice and the materials required to implement the idea.
The article we have presented has all the answers to the questions of independent masters and customers of the services of the construction crew. The process of constructing a shower is described in detail. Significantly facilitate the acquaintance with the information schemes, photos and video selection.
The content of the article:
Varieties of gangways, their features and differences
Drainage devices of this type differ externally, in internal structure and in height. Decorative grilles are the only visible part, and, of course, first of all, we evaluate their shape, and it can be round and oval, square and rectangular, in the form of a triangle or a long tray.
Lattices for ladders are made of different materials. The most durable, high-quality and affordable - made of brushed or polished stainless steel. Tempered glass, chrome, and brass are also used. Less durable, but cheaper - plastic. Plastic will properly serve the due date, but compared to the same stainless steel it will look too poor.
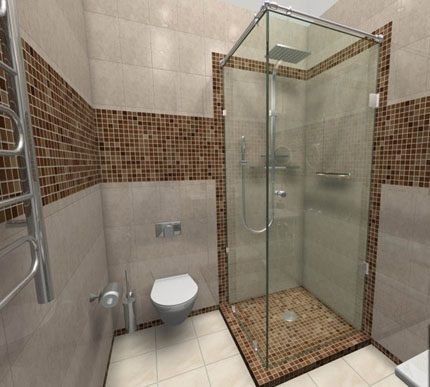
The lattice, as a rule, is chosen based on your own taste ... But more thoroughly and objectively, you should take a closer look at the variety of gangways, depending on the type of water intake device. The classification here is this:
- Point. They are a small water intake funnel closed by a grate. They can be installed in any place: in the center, in any of the corners, directly under the shower head, etc .;
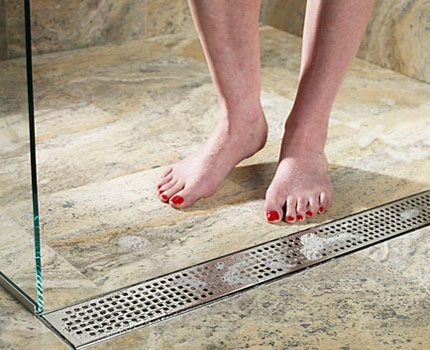
- Linear The water intake part is made in the form of a tray, by analogy overlapped by a grill. They are mounted both along the walls of the cabin, and in the center of the shower.
The most powerful in terms of the amount of wastewater received are linear gangways. They are adjustable in length, their throughput is easy to calculate according to the flow of water. Indispensable in showers, where several people wash at the same time, and when using modern watering cans in the style of "tropical rain".
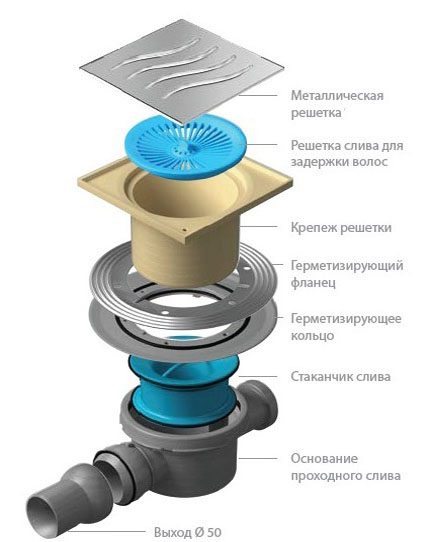
The following main elements are included in the shower drain kit:
- body (plastic, steel, cast iron);
- removable decorative grill (front panel) and a sieve for trapping hair and other debris underneath - both parts stand on top of the ladder body, resting on it;
- water intake funnel with sealing elements (waterproofing membrane and clamping steel flange for fastening);
- siphon;
- outlet pipe in the lower part, through which water goes into the sewer.
Now about the material from which the ladder itself is made. Cast iron installed exclusively at industrial facilities, in public pools, baths. Cons: difficult installation due to heavy weight. Pluses: durability, increased throughput.
Stainless steel - material that meets the requirements for rooms with stringent sanitary and hygienic standards (hospitals, kindergartens, canteens). Steel products are easy to clean and tidy.
At home, it is quite possible to operate plastic, the choice of material is not so important, although stainless steel is certainly preferable. It is anti-corrosion, durable, reliable.
And finally, when choosing a ladder, we take into account its height, which varies between 55-180 mm. It depends on how much the floor level has to be raised. Do not try to minimize this characteristic, as high gangways have better throughput.
The industry produces models with adjustable neck heights, they can be easily adjusted to the existing screed thickness. Modern shower drain models They are designed for water temperatures up to + 80-85 ° С, grates can withstand weight up to 300 and more kilograms.
The device siphon and outlet pipe
The purpose of the siphon is to prevent the penetration of unpleasant odors from the sewer pipes into the bathroom. This function is performed by a water trap located inside the siphon. But if you do not use the shower regularly, the drain gradually dries up, and odors begin to leak out.
In this case, the drainage system must be equipped not only with a hydro-, but also with a “dry” shutter. Its reliability will increase many times, since in the ladder with a "dry" shutter there are several dampers that block the drain under its own weight. The dampers open with a stream of drain water, and then close again.
In non-residential cold rooms, the ramps should also be equipped with a mechanical shutter that does not freeze in the cold and has a special drainage ring. If there is a break in the waterproofing, the water returns to the drain through the holes in this ring.
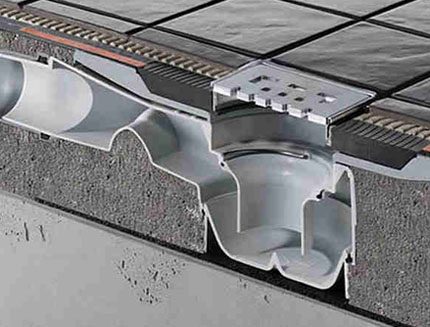
Shower ladders also differ in the cross section of the sewer pipe to which they are connected. It has a vertical or horizontal outlet. The diameters of the pipe and the sewer pipe must correspond to one another.
If the vertical drain, then the cross section will be 110 mm. This option is suitable for country houses and cottages, the sewage system in this case is attached from the bottom.
The second option, where the connection to the sewer pipe is lateral (horizontal), is considered more universal, and for apartments in high-rise buildings - the only possible one. For domestic purposes in this case, a diameter of 40-50 mm is sufficient.
The main criteria for choosing a ladder
Since the drain ladders differ in the variety of assortment, it makes sense to list on which parameters and in what sequence attention should be focused.
First step - we determine whether the outlet to the sewer will be directed horizontally or vertically. The ladder with a horizontally located outlet pipe has a lower height and is used if there is a restriction on the thickness of the screed.
A device with a vertical outlet can only be connected to a sufficiently low sewer pipe.
Second step - selection of the throughput of the ladder. According to this characteristic, the “plug” is 0.4-2.0 l / s. The larger the diameter of the outlet pipe, the higher the throughput of the ladder.
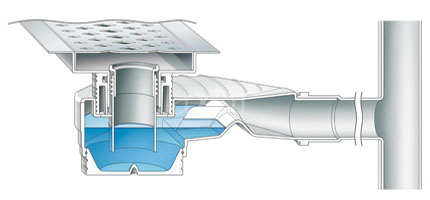
Third step - we choose between a hydrolock and a "dry" lock. The decision depends on how often the shower will be used.
A water seal implies the presence of a certain amount of water in the ladder constantly, and a “dry” valve protects against unpleasant odors and when the drainage channel dries. It will be useful not only in cases when the shower is rarely turned on, but also when embedding the ladder in the "warm floor".
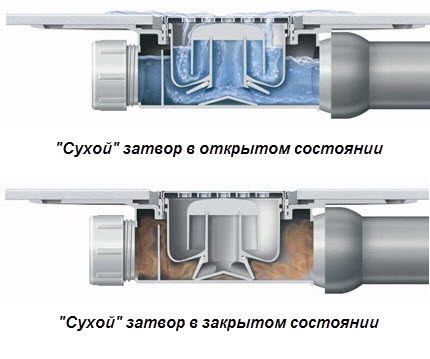
And only on fourth step the turn comes to the appearance of the ladder - or rather, its outer part (drain grate). It is important that it harmoniously blends with the overall design of the room, the size and color of the tile.
Fifth step - Finally, we think whether it is worth buying a cheaper ladder that is not regulated in height or whether it is better to pay extra for an adjustable model. Accurate installation, separation of installation operations into dirty and clean, high accuracy of joining with the level of floor tiles - these are the advantages of height-adjustable stairs.
Installation instructions in steps
If the house is just under construction, there are no complications about how to make a drain in the shower. The concrete monolith of the floor allows you to mount a vertical sewer drain. And in a high-rise apartment, the thickness of the screed is not enough even for a horizontal drainage device, so you will need to raise the floor level by 10-15 cm.
And in operating houses, first you have to remove the completely old coating and remove garbage. Only the sewer pipe should remain on the bare base. Most likely, it is pig-iron, and the period of its operation has long ended. It is best to replace such a pipe with a new plastic one, into which the branch pipe from the ladder will be removed.
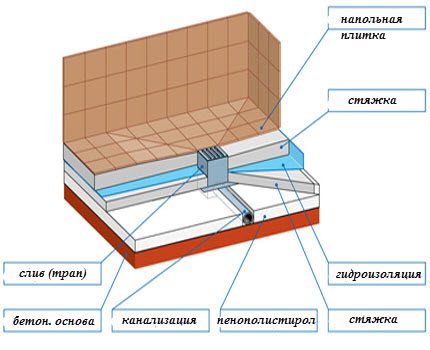
#1. Selection of tools and materials for work
The installation of the ladder is carried out simultaneously with the erection of a waterproof floor covering. Based on this, and you need to cook tools.
For laying the screed, for example, you will need buckets, a spatula (or mixer) for mixing the mortar, trowels, spatulas and graters for applying it to the base and leveling. To dismantle the existing floor - a perforator (impact drill), a chisel, a hammer.
You will need such a tool:
- tape measure, laser level, knife, ruler, square;
- tile cutters;
- a set of keys and screwdrivers;
- nippers;
- jigsaw, etc.
The list of necessary materials (its quantity depends on the floor area):
- dry DSP for screed (at the rate of 5 kg per 1 sq. meter);
- expanded clay concrete, foam concrete for “lightening” the bottom layer of the screed (in order to reduce the load on the floor);
- polystyrene foam in sheets for thermal insulation (50 mm thick);
- waterproofing membrane (damper tape);
- sealing mastic (with the calculation of the distribution of 3 kg per 1 m3);
- isoplast;
- tile glue (spent up to 5 kg per 1 sq. meter);
- grout for joints, silicone paste sealant.
And most importantly: a ladder in a complete set (with fasteners, etc.), plastic pipes, ceramic floor tiles.
# 2 Preparing the base for the ladder
Stage 1 - laying a branch pipe into the sewer. Drain pipe we cut into the sewer with the necessary level of slope (2 cm should be per linear meter) and fill the connection circuit with paste-sealant. If necessary, combine the shower drain with other drains - from the kitchen, washing machine.
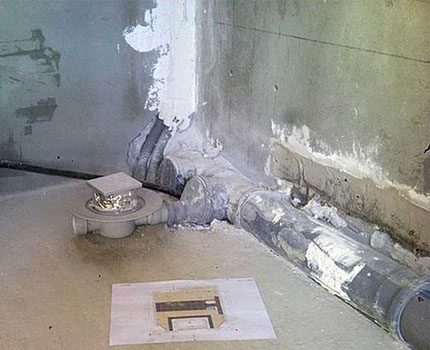
Stage 2 - calculation of the height of the screed (preliminary marking). We perform the following actions:
- install the level so that it shows the axis of the branch pipe into the sewer;
- set the ladder 1.5 cm above the branch pipe (focus on the axis);
- move the beam to the height of the grating of the ladder;
- add the thickness of the grate and another 1-1.5 cm to the slope height for normal water flow (at the rate of 1 cm per linear meter);
- from the line indicating the height of the grille installation, upward we postpone the additional height and move the level beam to a new mark.
It remains to mark with a pencil or marker the projection of the beam on the wall - this is the height to which you need to raise the floor in the shower.
Stage 3 - preparation of the foundation. We make a rough screed at this stage:
- we clean the floor, repair cracks, eliminate damage and bumps;
- based on the fact that the main screed will be laid with polystyrene foam 5 cm thick, and the screed itself cannot be less than 3 cm, lay down on the wall from the mark (see the previous paragraph) down 8 cm and get a new mark - this is the top edge of the rough screed ;
- fill the screed - to reduce the weight and load on the floors, lightweight concrete (foam concrete, expanded clay concrete) or foam blocks with fastening them with a reinforcing mesh and cement-sand filling with a layer of 3 cm is used.
Along the walls we put a damper tape to create a “floating” effect and protect the screed from possible cracking. We dry the screed as it should according to building standards for at least 14 days, if the temperature background in the equipped room is maintained at a temperature not lower than stable + 20º.
Stage 4 - waterproofing treatment. We use coating waterproofing - bitumen or other sealing mastic. We apply it with a brush in several layers on the entire surface with an overlap on the walls. Carefully coat the corners and joints of the walls with the floor - the place of the most likely spread of mold and fungus.
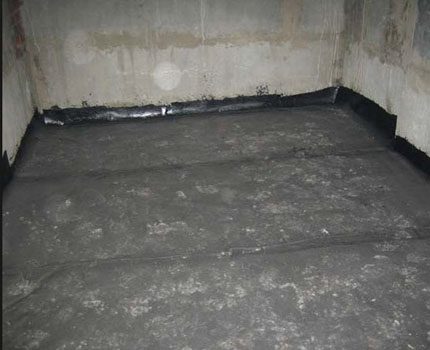
Mastic forms an elastic waterproof film. To increase reliability, it is possible to seal all joints with a roll of waterproofing material, grabbing them to a height of 25-30 cm, and coat with another layer of mastic on top.The waterproofing treatment should be repeated several times in the future as the floor layers build up. Read Furtherhow to properly waterproof a tile in a bathroom.
Stage 5 - selection of a place to place the ladder We experiment with the layout of the tiles and choose a place to place the ladder so that the general appearance of the floor looks aesthetically pleasing. The drain decorative grill should be located symmetrically with respect to the tiles and tile joints.
It would be nice to remove one tile and mount a spot drain in its place. If the tile is large, then the ladder is placed at the junction of two / three / four elements. Corner and linear ladders are also recommended to be combined with solid tiles, avoiding unnecessary cutting if possible.
# 3 Installation and construction of thermal insulation
Stage 6 - installation of a ladder. We assemble the ladder body, fix it, insert the outlet pipe located in the lower part, into the drain sewer.
Stage 7 - creation of a heat-insulating layer. Cut sheets of polystyrene into pieces. We strictly adjust the cut lines to the contours of the existing sewer components, we put polystyrene foam on the floor. Due to its heat-insulating properties, polystyrene foam will prevent heat from entering the walls.
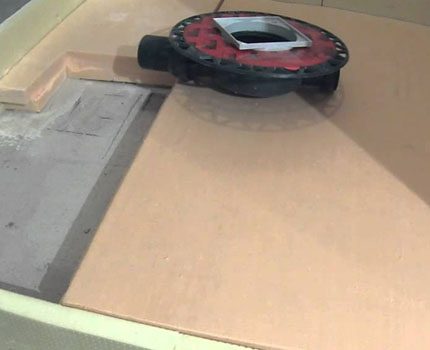
A damper tape is also needed around the perimeter, but it is better to cut it manually from the same material, only of a smaller thickness (3 cm). The joints between the pieces of expanded polystyrene are sealed with tape so that the cold from the concrete does not penetrate from below.
#4. Floor screed device
Stage 8 - pouring the second layer of screed and the formation of the slope of the floor. We close the insulation with a reinforcing mesh. We set the strips “beacons” to indicate the bias towards the drain. Special standard trims can be bought at the store or made independently from wood.
If you are lucky with the choice of model, then complete with a ladder you can find a set of guide rails with a thickness varying in length (the same "beacons"). Assembled together, they are a frame that facilitates pouring screeds with a slope to the drain hole.
Having set up the “beacons” and checking all measurements, we fill the floor with an ordinary mortar of cement and sand in the ratio of 3-4 parts of sand to the first part of cement. The screed should hide the drain device completely. Only the flange remains open. We strive to get the surface as even as possible, we make the slope at the rate of 1 cm per linear meter.
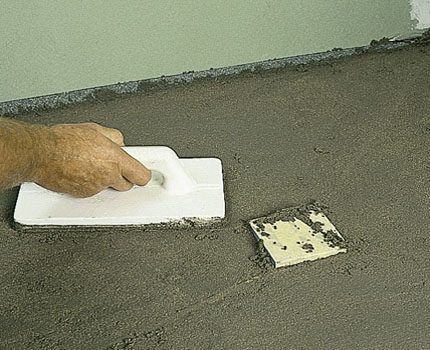
The easiest way to make a bias is to the ladder-tray located along the wall, since it is directed in one direction. To the point ladder located in the center, the floor slope must be done from four sides, which is technically much more complicated. After finishing work, we dry a coupler 3-4 days.
Stage 9 - waterproofing treatment. Stelem on top of the dried screed waterproofing substrate (isoplast sheet). We cut out the hole, output the flange through it, fasten with screws along the edges. We fuse the isoplast to the surface, heating its back with a blowtorch. Once again, we overwrite the corners and joints of the floor with the walls with sealing mastic.
#5. Finishing work
Stage 10 - assembly of the ladder. We place a siphon in the ladder body, try on a decorative lattice, placing a rubber o-ring under it.
Stage 11 - pouring the third layer of screed. We temporarily remove the grate from the ladder and cover the hole with a piece of waterproofing material so as not to contaminate the inside of the ladder. We make the last screed similar to the previous one. At the same time, we leave a small margin of height, to which you can raise the floor level at the final step, laying tiles.This margin is equal to the thickness of the tile plus 1-2 mm (allowance for the adhesive layer).
The last drying is the longest. The screed should mature, which takes an average of 25-28 days, but it is better to withstand the full cycle of 43 days. In this case, moderate humidity should be maintained (in the first days, regularly wet the surface), temperature + 20-22 ° C, and also protect the room from drafts and direct sunlight.
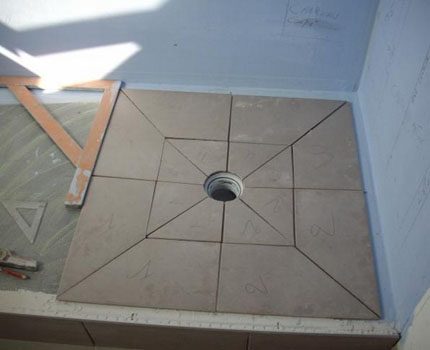
Stage 12 - laying tiles. We lay the tiles in the direction from the ladder to the walls, using tile glue and cutting carefully in the right places. Dry for 1-2 days.
On this installation of a shower ladderfinally completed. It remains to wipe the tile joints with waterproof grouting materials.
Conclusions and useful video on the topic
The internal structure of the shower ladder (for example, the ladder-tray):
Shower drain installation:
Laying tiles in a shower tray with a slope:
In conclusion, we can say that the drain in the bathroom floor is a practical and original idea. The popularity of open showers is explained not only by their modern design, but also by their convenience. The only thing that scares many is the risk of flooding the neighboring rooms and lower floors with water. But if the installation is done professionally, there is no reason for concern and there can not be!
If after studying the material you have questions or have been able to independently equip a shower ladder, share your experience with our readers. It would not be bad if you supplement the comment with a photo of your homemade product.

 How to arrange a shower drain in the bathroom floor: step-by-step installation instructions
  Waterproofing a bathroom under a tile: what is better to use under a tile
  DIY cast iron bathtub installation: a detailed step-by-step guide
  The height of the bath from the floor: standards, norms and permissible deviations during installation
  How to make a screen for a bathtub from a tile: methods of self-arrangement
  How to install a bath yourself: a step-by-step installation guide
  How much does it cost to connect gas to a private house: the price of organizing gas supply
  The best washing machines with dryer: model rating and customer tips
  What is the color temperature of light and the nuances of choosing the temperature of the lamps to suit your needs
  Replacement of a geyser in an apartment: replacement paperwork + basic norms and requirements
Once I came to the preservation in the perinatal center, I got a ward with a separate toilet room, in which the drain worked in a strange way. When I took a shower, the water did not completely go into the drain and accumulated on the floor, I stood in a puddle. Moreover, the water itself did not leave, it had to be collected with a rag. Apparently, at some stage the installation technology of the shower drain was disrupted.
Hmm, good food for thought. I just planned to recycle the old bath and make a normal shower. There are already options for coloring the tiles, it looks very cool, maybe I’ll even get the same if I have the opportunity, I need to google it) It seems like there’s no technical difficulties, I have to manage it myself.