How to lay sewer pipes in a private house: schemes and rules for laying + installation steps
It is inconceivable to consider the water supply of a residential facility without a drainage system. Therefore, even before construction, you need to decide where and how to lay sewer pipes in a private house, how to arrange an external pipeline.
We will tell you how to lay sewer pipes within the construction and on the site. We will show you how to assemble the system and fasten its components. In our proposed article, installation rules and building codes are given, and the technology for performing internal wiring is described.
The content of the article:
Highlights of Sewerage Construction
Without preliminary preparation system wiring diagrams drainage of construction is out of the question. Carefully thought out, drawn up scheme will allow rational use of investment.
In addition, thanks to the preliminary drawing up of the sewage scheme of the building, more opportunities are opened for achieving the required system efficiency.
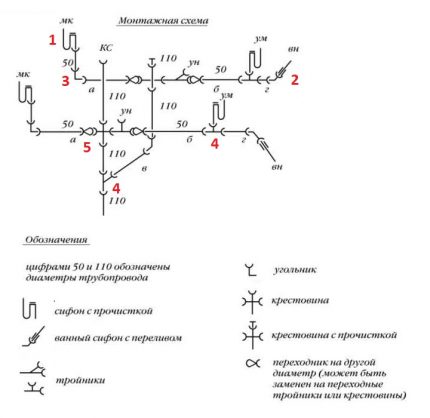
The main criteria for drawing up a scheme, as a rule, are considered as follows:
- the number of people on the territory of the residential facility;
- the proposed technology for the treatment (treatment) of sewage;
- routing of external drainage lines;
- wiring of internal collection and drainage lines.
Having determined the main points of construction, they calculate the number of system components, including the meter of sewer pipes, and make a sketch of the project.
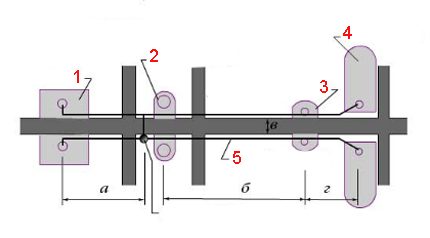
Pipe routing for a one-story house
Given the availability of lightweight in the market polypropylene pipes and a complete set of installation fittings, to build a sewage system in a private house is quite affordable on its own. However, without consulting specialists and resorting to established standards, building a quality sewage system is not easy.
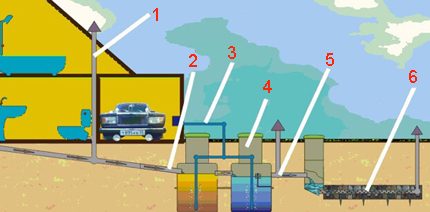
The classic sewer scheme in general contains:
- sewer riser;
- pipes connecting the internal components of the system;
- external pipeline that discharges common drains;
- receiver system.
According to the existing standards for wiring the scheme of a one-story building, the areas adjacent to the external outlet point of the drains are sanitary fixtures of the kitchen and sanitary unit.
The wall separating these two rooms of the house is considered the installation site of the riser pipe. The area of the lower point of the riser pipe is discharged to the external line, and the upper one is displayed on the roof.
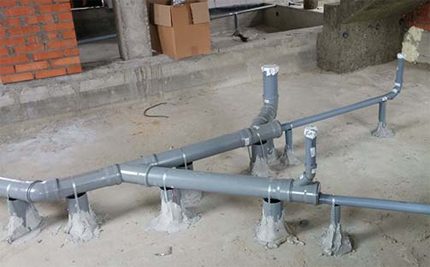
The most remote plumbing fixture of the economic zone is connected to the riser by a pipe with a smaller diameter and taking into account the slope towards the riser by 1.5-2º. Formation Rules sewer pipe slope are given in our recommended article.
The laid highway is used to connect other plumbing fixtures of the economic zone. The closest appliance to the riser is traditionally the toilet.
Thus, a gravity flow diagram is created. sewer wiring one-story private building. However, not in every case of the plumbing network device there is the possibility of organizing a gravity flow scheme. Then the problem is solved by introducing into the circuit additional equipment - a pump.
Pipeline in a 2-3-story building
The structure of a private house on two or three floors is characterized by the arrangement of several economic and technical zones. Moreover, the arrangement of such zones is provided for on each of the existing floors. Respectively, sewer wiring in such conditions, it seems a somewhat complicated schematic option compared to the first - a one-story house.
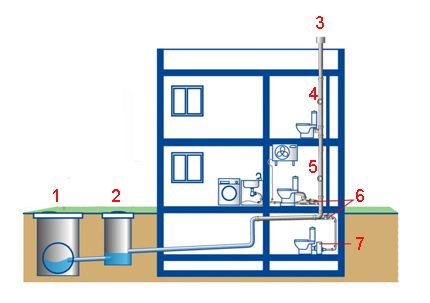
Standards and rules for the construction of multi-story buildings regulate the construction of premises of the same type of functionality at a single vertical level. Therefore, the sewerage scheme in this case, for example, regarding toilet rooms, provides for wiring for rooms located one above the other.
Riser pipe designed for sewer ventilation multi-storey buildings, is passed through all floors and is displayed on the roof level, taking into account the additional rise of 0.3 m and above, if the roof is not in use.
For the option with an operated roof, this parameter is at least 1.5 m. For pitched roofs (a popular construction of private houses), the riser is withdrawn to a height of 0.5 m from the level of the roof ridge.
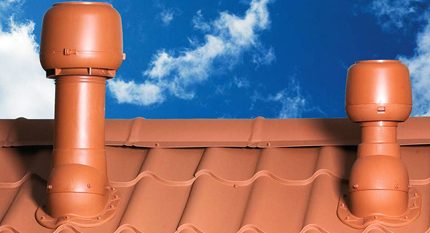
Also a device diagram fan boner multi-storey buildings provides for the use of compensating elements at the points of passage of the pipeline through the ceiling.
Accordingly, transitions through ceilings are made waterproof and sound-absorbing, equipped with special fire cuffs.
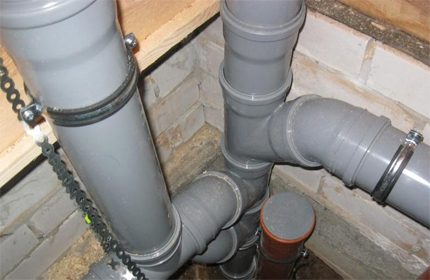
The riser pipe is fixed directly to the wall using metal clamps with rubber linings. Guidelines for selecting sewer pipes for internal wiring given here, we recommend reading useful information.
The fastening is carried out without tight tightening - an overhead, so as to ensure a natural free vertical movement of the pipe. The lower part of the riser through the outlet is discharged to the external sewer line.
What do you need to know about pipe laying?
Traditionally, drain lines from plumbing fixtures such as sinks, bathtubs, and household sinks are made on the basis of pipelines with a diameter of 50 mm. The outlet channels of the toilets require a larger pipe diameter of 110 mm.
At the present stage, polypropylene pipes are traditionally used for the construction of internal sewer lines. However, depending on the specific project and the load (throughput) capacity of the sewer network, different diameters of linear pipelines and risers can be used.
The table below shows the options.

Gravity pipelines of horizontal lines with a diameter of 40-50 mm are mounted, observing a uniform slope rate of 0.03 m per 1 m of length.
Gravity pipelines with a diameter of 85 and 110 mm are laid, observing the norm of a uniform slope equal to 0.02 mm per 1 m of length. In this case, the maximum allowable slope angle is not more than 0.15 mm for the entire length of a separately mounted sewage section.
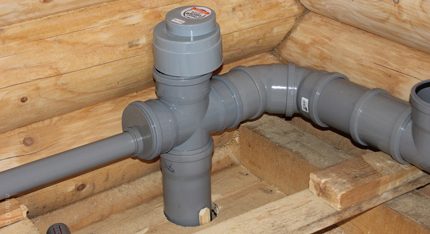
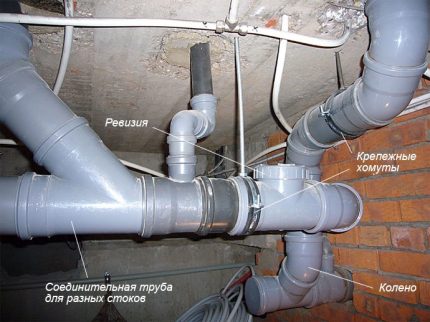
Directly connecting the outlet lines and the riser are performed using tees, crosses at angles of 45º or 60º. The execution of the scheme in this way allows avoiding clogging of pipelines during operation.
Scheme sewer country house and apartments necessarily include the introduction of audits (cleanings) at points on the line where the risk of clogging is high.
For a scheme in a private house, the location of such elements of the scheme is shown in the table below:
| Pipeline mm | The distance between the elements on the line, m | Item type |
| 50 | 12 | audit |
| 50 | 8 | cleaning |
| 110, 150 | 15 | audit |
| 110, 150 | 10 | cleaning |
| 200 | 20 | audit |
Sewer construction procedure
Briefly consider the main stages in the construction of a sewer pipeline in a private house. Even if you do not decide to do the work on your own, you can control the hired specialists.
Stage # 1 - installation of the yard network
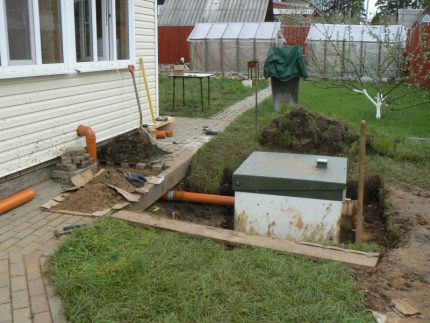
The creation of a sewer system begins with the stage of building an external (yard) network. If the length of the yard network to the existing manhole more than 12 meters, an additional viewing well is arranged. At the same time, the minimum permissible distance from the wall of the house to the viewing well is 3-5 m.
With methods of installing the outer part of the pipeline and the rules for laying sewer pipes in the ground next article, which we highly recommend reading.
In the laying of external sewer lines now mainly used polymer pipesAttracting light weight, excellent performance and affordable price. When laying a route above the level of seasonal freezing, heatersprotecting lines from the formation of ice caps.
Often, owners of private buildings have to deal with the lack of a centralized sewage network. In this case, an autonomous system for collecting and filtering wastewater (septic tank) However, the “external internal network” connection principle remains the same.
Stage # 2 - the construction of the input node in the house
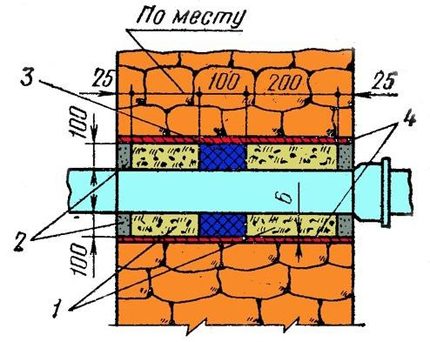
Next, you need to build an input node directly in the structure of a private house (foundation, basement wall). The construction of the site is carried out taking into account possible deformations, for example, due to subsidence of the structure.
The input unit and the outer pipe are securely insulated.
Stage # 3 - installation of risers and bends
The next step is the installation of riser pipes of the internal network. It is recommended that these components of the circuit be assembled and preassembled without mounting or with partial mounting.
Full fastening is carried out after the final assembly of the entire system. Having completed the installation of riser pipes, horizontal drainage lines are built taking into account the required slopes.
Stage # 4 - connecting plumbing
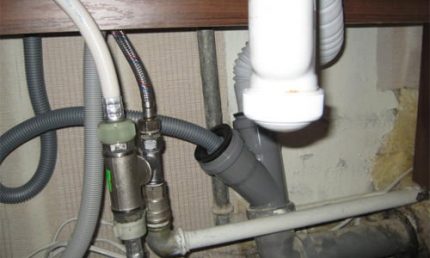
At the final stage, installation of plumbing fixtures and connecting each device to a corresponding branch through a siphon pipe.
In addition, it is worth noting: provided that the building height is less than 10 meters, the internal sewer system can be built on the basis of pressureless pipes. At higher heights, pressure pipes are used.
Conclusions and useful video on the topic
The video demonstrates the video practice of wiring and laying a network of pipelines, taking into account the construction of a private house. A full installation cycle, including testing the system in the simplest ways.
Knowing the procedure for arranging a drainage system from the house, you can try to build a sewer yourself. True, at the stage of laying the pipeline outside, help will be required to deepen the pipes into the ground.
If in doubt, it is best to contact the company with a good reputation and positive recommendations from your friends. Then the sewer system will be arranged correctly and will serve your family for more than a dozen years.
Please leave comments in the block below. Share useful information, photos and your own experience gained in the field of installation or repair of sewer pipelines. Ask questions about controversial, interested, and obscure points.

 Drainage in a private house: device methods, schemes + main stages of construction
  How to clean sewer pipes in a private house: varieties of blockages and methods of cleaning
  Sewer pipes PVC and HDPE for outdoor sewage: types, characteristics, advantages and disadvantages
  Pipes for domestic sewage in the house: a comparative overview of modern types of pipes
  Sewerage in a private house: an overview of the options for arrangement + a step-by-step guide
  Plastic sewer wells: varieties + installation features
  How much does it cost to connect gas to a private house: the price of organizing gas supply
  The best washing machines with dryer: model rating and customer tips
  What is the color temperature of light and the nuances of choosing the temperature of the lamps to suit your needs
  Replacement of a geyser in an apartment: replacement paperwork + basic norms and requirements
Indeed, following such detailed instructions, it is not difficult to make a sewer in a new house. But more often, people are faced with the need to sewer into an existing private house. From my own experience I know that the greatest difficulty is the exit of the pipe from the house to the street. If you bring under the foundation, then the pipe will enter the septic tank already at a depth of 100 cm. But it’s scary to drill the foundation, suddenly it will weaken it. What would experts advise in this case?
In general, in such cases, there is no choice but to drill holes; they themselves fell into this situation. They are not afraid of this procedure, but still it is necessary to be extremely careful, in the end it is the foundation of the whole house and it is unlikely that you will want to see cracks in it.
It is very bad when the technological window is not provided in advance. Arm yourself with a puncher and a crown for concrete, carefully measure it (this is the case when “Measure 7 times - cut once”) and drill.
Hello! And why are you afraid of the pipe entering the septic tank below 1 meter? Manufacturers of septic tanks recommend putting the sewer pipe in no higher than 0.6-1 meters, or better, below the freezing depth, i.e. for the middle zone of Russia - 1.2-1.5 meters. In this case, the conclusion of the pipe can be done under the foundation, if its design allows and does not frighten the volume of excavation.
In any case, making technological holes all the more so of such a large diameter at the base of the house is absolutely impossible! This will necessarily lead to a violation of its integrity - the house can sag, squint.
If you can’t remove the pipe under the foundation in any way or too troublesome, then it’s better to do this: make a hole in the outlet in the wall of the house, and after the outlet, deepen the pipe already on the street. In this case, consider 2 nuances:
1) the pipe should have a slope of at least 5 degrees, if this is not possible to provide, you will need a fecal pump;
2) the pipe section that appeared on the street should be insulated.
It will look something like the attached photo.
Note. In the paragraph: “Gravity pipelines with a diameter of 85 and 110 mm are laid, observing a uniform slope of 0.02 mm per 1 m of length. In this case, the maximum allowable slope angle is not more than 0.15 mm for the entire length of a separately mounted sewage section. ” - typos are possible in the size of the slope, it will be correct “Gravity pipelines with a diameter of 85 and 110 mm are laid, observing a uniform slope of 2 mm (or 0.02 m) per 1 m of length. In this case, the maximum allowable slope angle is not more than 15 mm (or 0.15 m) for the entire length of a separately installed sewage section.