How to drain water from a water heater to preserve the water supply system
In summer cottages or country houses that are not used for living in the cold season, it is necessary to take care in advance of the preparation of all engineering systems for the winter. The water and heating circuits must be completely freed from water. This also applies to devices for heating water.
We will tell you how to drain the water from the water heater quickly and accurately, in what sequence the work is carried out to preserve the systems. We have described in detail all the options and methods for removing water from equipment. The rules for disassembling equipment that must be observed are given.
We supplemented the information presented for acquaintance with visual diagrams and illustrations, step-by-step photo-guide and video-instructions.
The content of the article:
Reasons to drain the water heater
The problem of preserving the water supply system is relevant if it is possible to lower the temperature in the room to +5 ° C or lower.
A negative temperature will cause the liquid to freeze in the pipes and tank, which can lead to ruptures and damage to the water heater and piping.
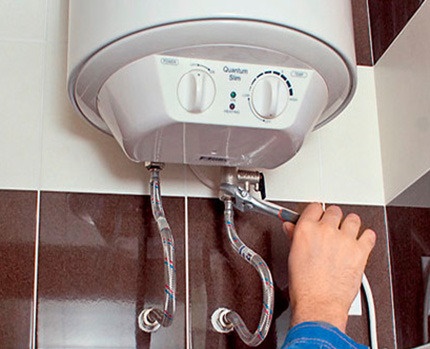
Some manufacturers do not recommend leaving the device for long without water for no good reason, since corrosion occurs much faster when in contact with oxygen. But in the case of storage of the device at subzero temperatures, all water from the system must be drained.
Even storage water heater - boiler - It is used all year round, it is still necessary to periodically clean it. Do this once or twice a year - depending on the quality of the water. In addition, during operation, there is an accumulation of dirt and bacteria (and even there can settle legionellacausing pneumonia), a scum forms which covers ten and the inner walls of the tank.
Scale settling on TEN-e, works as a thermal insulator. The longer the water heater does not clean, the thicker the insulating layer it covers. Because of this, the device over time heats itself more than it processes water. With a contaminated heating element, energy consumption increases by 25-50%.
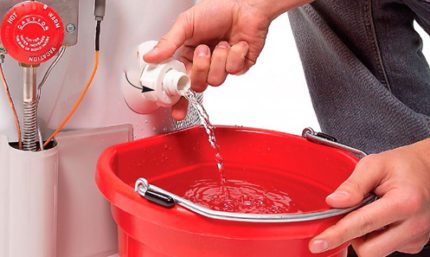
A number of manufacturers in the documentation for the heating unit indicate that in order to prevent the discharge of a small amount of water through the drain pipe, at least once a month should be carried out. This is done to remove lime sediment and to control the flawless operation of the valve (crane).
For water removal from water heating equipment There are a number of standard prerequisites:
Signs by which to determine that it is time to immediately clean:
- The pressure of the water became weaker;
- The water began to warm longer;
- The device began to make an unusual noise;
- From the safety valve, water drips very often or does not drip at all;
- The time has come for scheduled preventative cleaning.
The need to release the boiler from the contents may also arise in the event of a breakdown, when replacing the heater;and or magnesium anode. In all these cases, water is drained from the unit according to a similar scheme.
If the water in the tank simply stagnates and exudes an unpleasant odor, it is enough to open the tap and drain the water for some time to replace it with fresh. Then turn on the maximum heat. The procedure must be repeated if necessary for the third time, etc. This will kill all pathogenic microflora.
Water Heater Release Procedure
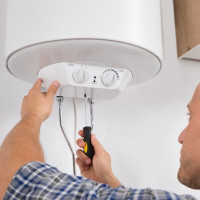
Although draining water from an electric water heater is considered an ordinary procedure, designed to extend the life of the appliance, it is better to carefully study the instructions. Each brand or model can have significant differences, so all the nuances are best studied in advance.

Sometimes the manufacturer does not allow anyone who is not a service representative to intervene in the operation of the device until the warranty period ends. Complex heating devices should not be disassembled on their own to completely drain the water, so as not to incapacitate incorrect actions.
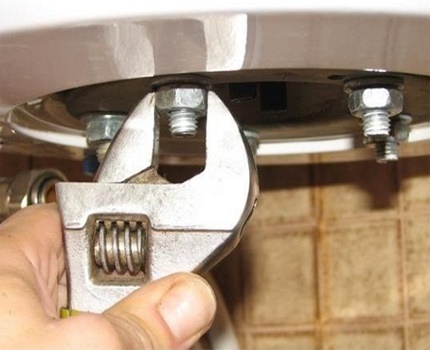
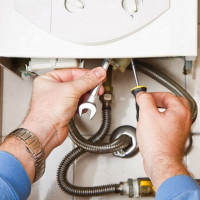
If you need to disassemble the boiler strapping, do not do without a set of tools.
From the tools you may need:
- 4 mm hexagon;
- adjustable wrench (you can take gas number 2);
- rubber hose of suitable diameter;
- straight and cross-shaped screwdrivers.
Also prepare a container if the boiler does not hang over the bathtub and water from the heater may spill onto the floor.
Before you begin, you must make sure that:
- The water heater is disconnected from the power supply.
- The cold water tap has been shut off.
- The temperature in the tank dropped to safe values.
To speed up the cooling, you can turn off the heating mode and lowering a certain amount of hot water to dilute it with cold.
Water is drained from electric water heating equipment in the standard sequence:
Accounting for a water heater device
There are videos on the Internet in which the "craftsmen", having connected the hose and unscrewing the drain valve, wait for the water to somehow flow out of the closed system. In order for your actions to be conscious, you need to familiarize yourself with water heater operating rules, its device and principle of action.
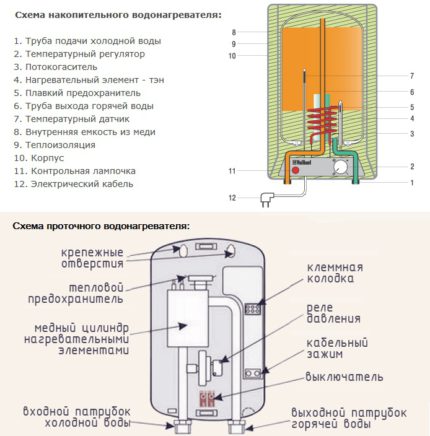
Water heater device:
- Inner tank.
- Thermal insulation.
- External decorative case.
- Control sensor.
- Electrical cable.
- Temperature sensor.
- Conclusion of heated water.
- Magnesium Anode Protects against rust formation, neutralizes the effect of corrosion. Requires replacement every two years.
- TEN - a heating element. It is made mainly of a nichrome spiral wrapped in a copper casing, which contributes to the rapid heating of water.
- Flow extinguisher. Prevents mixing of layers of cold and warm water (retains cold water below). Thus, the cold streams, not mixing with the hot ones, remain below, and the hot ones above. This allows you to continuously use warm water while dobor water from the system.
- Temperature regulator. It helps to set the heating temperature to 75 ° C and fix it at a comfortable value. At a temperature of 85-95 ° C, an automatic shutdown occurs.
- Tube of water intake from the water supply system.
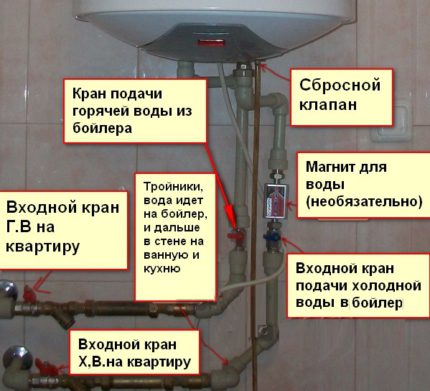
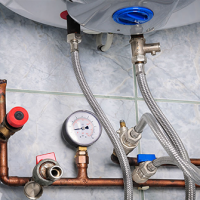
Since the pipe for supplying water to the water heater is located below, water can only be drained through it. Why so, you can understand by looking at the diagram. On water heaters of any manufacturers mark the entrance and exit. There is a blue gasket on the water supply pipe, and a red one on the outlet.
Standard connection (with tee)
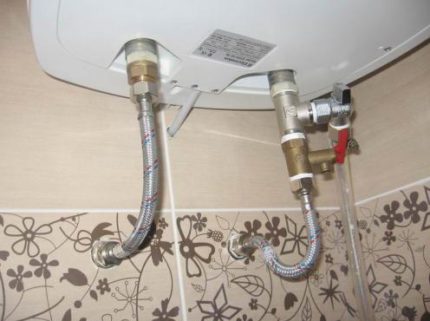
This connection is recommended by manufacturers, in which a tee with a tap is installed in the pipe section from the device to the safety valve. To drain the water from such a system of tools is not needed.
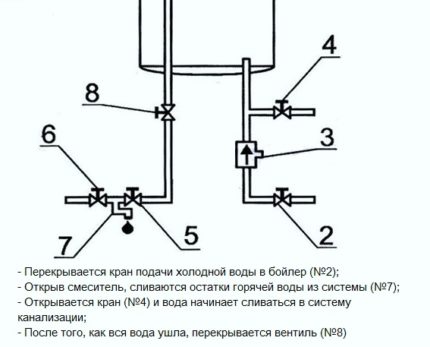
Standard connection diagram:
- Water heater.
- Water tap to the boiler.
- Safety valve. It is installed to prevent the return of water in the absence of it in the system.
- Tee with a drain tap.
- Mixer tap for supplying hot water.
- Cold water tap.
- Mixer.
- Shut-off valve. It blocks the drain of hot water from the appliance.
If the water heater is connected correctly, it will take no more than 10 minutes to drain the water from its tank.
Step by step discharge of water from a water heater can be described as follows:
- The device is turned off from the outlet, the water supply to the water heater is shut off (2).
- A hot water valve (5) is opened, and liquid is drained from the tube through a mixer (7). The faucet (5) is left open - air will enter the system through it.
- Put on the drain hose, open the drain cock (4) and drain the water.
- As soon as the water is gone, close the shut-off valve (8).
The procedure may take several hours. It can be accelerated only by removing the hose from the cold water intake pipe, thereby increasing the size of the jet.
The cause of a long drain may be a poor intake of air into the system through the mixer. You can correct the situation either by removing the hose from the pipe to remove hot water, or by connecting a pump (compressor) to the hose, with which to pump air into the system.
To start the water heater, close the valve on hot water pipe (5) and a drain cock (4), open the access of cold water (2) to the device. The boiler can only be plugged into the socket after full filling.
The system can be improved - the drain pipe is connected to the sewer. The draining process will be completely effortless and without a single drop spilled.
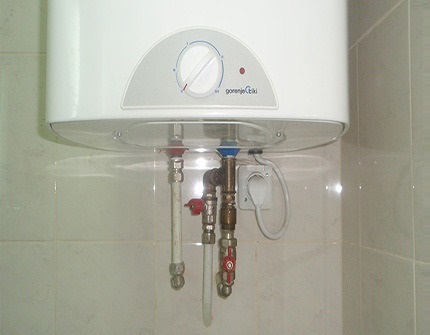
Advanced Standard Connection Type
It is very convenient when the tee is placed on both sides - at the inlet of the cold and the outlet of the heated water.
With this binding, work is carried out in the following sequence:
- Turn off the tap at the water inlet to the device.
- Put on the drain hose.
- Open the mixer to relieve pressure inside the tank and drain the remaining water in the hose.
They direct the drain hose to the sewer or the prepared container and turn the air supply valve on the tee to the open position.
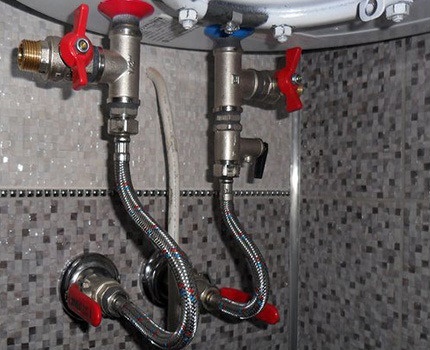
A simplified way to connect a boiler
Simplified, this method can only be called from the point of view of the employee who implements it. For the user of the device, he will create a lot of inconvenience.
The procedure for draining the water is as follows:
- Stop the water supply to the appliance.
- The mixer is opened and the remaining warm water is drained from the hose.
- Open the flag on the safety valve and drain the water.
The difficulty is that the water will merge for a very long time, since in order to drain it, it is necessary that air enters the tank. From the mixer, it will pass poorly. Or not at all. The problem is solved by removing the hot water pipe. Twist carefully so as not to damage the thread.
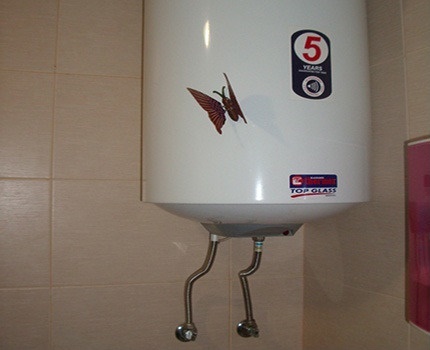
To make the process much easier the next time you drain the water, take advantage of the fact that the boiler piping is disassembled and assemble it correctly.
With any connection, some deviations from the standard circuit are possible. Firstly, a shut-off valve, which is installed in order to shut off the supply of warm water to the mixer, may be absent.
In this case, while the water is from gas or electric boiler merges, it is necessary to make sure that none of the family members use the water supply, otherwise the water through the mixer will begin to flow into the boiler, filling it.
Secondly, the absence of a flag, which opens the drain on the safety valve, can become a real problem.
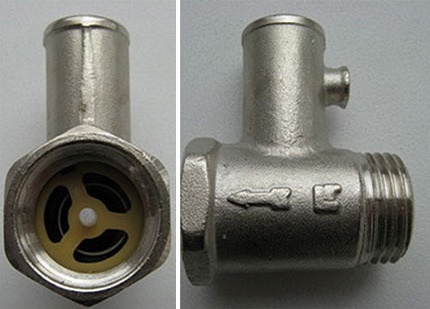
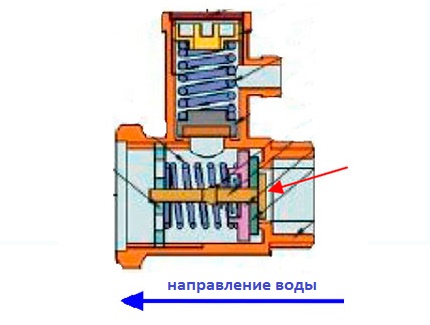
In order not to take pictures safety valve from the water heater, you will have to hold the spring (see figure) for the entire time that the water will pour.
Emergency Water Removal
If you do not have time to wait until the water from the water heater gradually merges or the relief valve does not work, there is a way to do this much faster.
Actions are performed in the following sequence:
- Overlap cold water. If there is no tap to supply water to the boiler, then shut off the water supply at the entrance to the apartment.
- Open the valve at the outlet of warm water from the heater, while the internal pressure is compared with the external. Then the tap is closed.
- If the water heater does not hang over the bath, substitute a bucket or a deep basin.
- Disconnect the warm water hose.
- Unscrew the tee with a relief valve (we repeat, this should be done only if the relief valve does not work or if you need to drain the water very quickly).
It remains only to manage to change capacities in time. To stop the flow of water during the replacement of containers, block the flow of air into the heater.
Draining residual water from an electric boiler
The device of the boiler is such that no matter how you try to carefully drain the water, there is still a certain amount of liquid, and with it the sediment will remain inside.
How to drain all the water out of the water heater without a trace, we will consider further:
- The bulk of the water is drained by one of the methods described above.
- Unscrew the decorative cover, which is located at the bottom of the tank.
- Holding the cover, disconnect the wiring of the warning lamp.
- Disconnect the electrical wires. To properly attach them back, you can photograph their original placement.
- Then, slowly, counterclockwise, unscrew the flange, which serves as a support for tena, first just loosening the nuts, and letting the remaining water gently drain from the tank, and then completely unscrewing.
- Take out ten slowly, being careful not to damage it and the tank.
Note that a heating element may form scale, which will prevent it from leaving the tank. Therefore, if the seizure of TEN-and resistance is felt, take it out carefully, moving left and right.
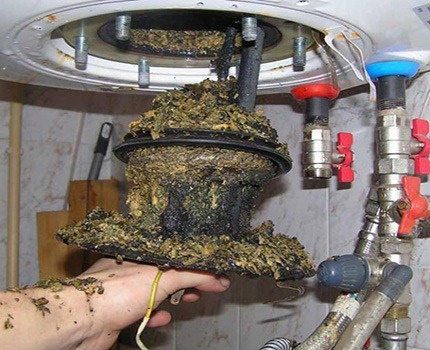
If you had to drain the water from the boiler, then at the same time you have to clean it. After flange removal and removal tena there will be no doubt about that.
General rules for disassembly and flushing
If there is a lot of sediment in the tank, part of it can be removed manually. Before this, the rubber gasket is removed, which serves as an insulator between the flange and the water tank. It should also be cleaned.
The inner walls and bottom are washed with a hose with water. You can connect cold water to the hot outlet. Inside the water heater, the heated water intake pipe reaches the very top. Water entering the tube is slightly sprayed and washes the inner walls of the tank. They start the water in several stages and clean the debris from the bottom.
If there is an unpleasant odor in the container after washing, you can treat it with a solution of vinegar. On a long stick they attach a sponge dipped in vinegar and wipe the inner surfaces.
Cleaning TEN-and happens first manually. Using a screwdriver or knife, remove the upper loose layer of plaque. All that has not been removed is removed after soaking the heating element in citric acid.
To do this, a hole in the plastic bottle is made a little larger in diameter than the size of the heaterand. Pour hot water into it and add citric acid (vinegar can be used). Leave for a day, occasionally stirring the solution or replacing it with a new one.
At the end of the specified period TEN soft scale is removed and easily removed. This can be done with a wooden or plastic spatula.
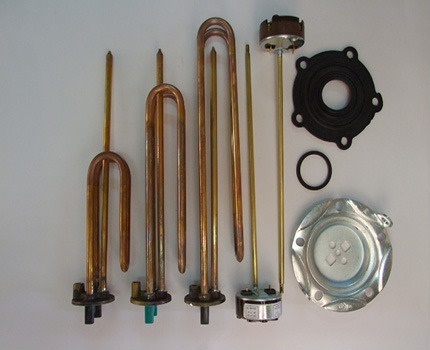
Assemble the boiler in the reverse order and start the water. Before connecting the device to the mains, it is checked for leaks.
Conclusions and useful video on the topic
Video # 1. Once again, about draining water with a standard connection to an electric water heater:
Video # 2. What to do if the relief valve does not have a drain flag:
Video # 3. Operational method of draining water from a water heater:
Like any device that comes in contact with water, an electric water heater requires special care. Corrosion, oxidation of threaded joints, scale and downtime can lead to the fact that the device will serve much less than the manufacturer's declared time. Therefore, competent operation and timely preventive maintenance are so important.
Want to tell how you yourself drained water from a water heater for conservation, cleaning or repair? Did you find any controversial issues when reading the information provided? Please write comments and ask questions in the block below.

 How to drain water from a water heater: the pros and cons of different methods + an example of work
  Do-it-yourself water heater installation: a step-by-step guide + technical standards
  Why the geyser does not heat water: diagnostics of malfunctions and methods of their elimination
  Schemes for connecting a water heater to a water supply system: how not to make mistakes when installing a boiler
  How to make a DIY heater repair: methods available for a home master
  DIY instantaneous water heater installation: step-by-step instruction
  How much does it cost to connect gas to a private house: the price of organizing gas supply
  The best washing machines with dryer: model rating and customer tips
  What is the color temperature of light and the nuances of choosing the temperature of the lamps to suit your needs
  Replacement of a geyser in an apartment: replacement paperwork + basic norms and requirements
I recently cleaned my water heater and, to be honest, while documenting to blow air into the intake cock, I was waiting for the water to drain in a thin stream. But patience is not ironic and I decided to speed up the process and had to think, but here everything is already assembled and written. Now I regret that I did not get on the Internet and did not read a hundred and how to do it. In general, everything is quite easy when you know what awaits you and how to act. Go for it and it will work out!
Mechanical cleaning of the heater, which is recommended here, is not the best option for descaling. All the same, the old heating element has already corroded and its walls are thinner than the new one. Damage to such a heater is easy. I would recommend chemical cleaning, with citric acid or vinegar, or replacing the heater with a new one. In water heaters, the heating elements are thin, their service life is short.
But the phrase is incomprehensible to me: “... In the water heaters the heating elements are thin, their service life is short.”
Two years ago, I bought an apartment on the secondary. A boiler is installed in the bathroom and it has been standing for a long time. According to the first owner of the apartment, the boiler has been standing for 17 years. Naturally no one cleaned it. I will not risk opening and cleaning, let it work as much as it has left.
I use the boiler only in the summer, when the hot water supply is turned off. But there was a need to drain the water and remove the boiler in order to repair the bathroom (replacing tiles). There is no drainage system on the boiler, the valve slagged over time and the moving parts wedged. How to drain the water seems understandable, at the same time and I want to change the fittings at the inlet. Are there any nuances?
Hello, Nikolai. Firstly, the thickness of the heating element has almost no effect on its service life. The operating life is more affected by the quality of the water, as well as the build quality of the boiler itself.
As for the fittings, then you can supply exactly the same as you had before. If you need a more modern implementation, then you will need the following components:
1. Filter;
2. Pressure regulator;
3. Cut-off valve, 2 pcs.;
4. tees;
5. Ball valve for draining;
6. American, 2 pcs.
For clarity, I attach a detailed connection diagram. Consumables will cost you about 1000 rubles.
As for connecting the water heater to the network, it is better to implement it through a separate machine. If this has not been done before.
I have just such a problem - there is no tap to drain. We have to twist the return line and wait for the water to merge from the boiler in a thin stream. And this is a long time. And the water does not drain completely, at least I did not succeed. Maybe of course I'm doing something wrong, but still a little water remains in the tank. It is good that the tank itself is located above the sink and the remnants merge clearly into it.
I am in shock. I thought the water supply would make my existence in the country easier, but it turned out I found the problem on my own. I will never be able to do all this - given that there are no men in the house ... hmm ... still clean it all ((((And this is not a city, there are no plumbers at the cottage.