PVC pipe hanger: popular options + step-by-step instruction
The house begins with an entrance hall. Having barely crossed the threshold of a dwelling, a person begins to look for a place where you can hang clothes. If there is no space for a typical cabinet in the hallway, then a compact hanger will be the best solution. This element can not only fulfill its main task, but also become a decoration of the room.
Designers and home craftsmen are increasingly collecting household items from non-traditional materials - this allows you to get an original product at an affordable price. For example, a made hanger made of PVC pipes with your own hands will cost inexpensively - you can use scraps remaining after installing the pipeline. Interesting idea, right?
We offer to consider a selection of different hangers and racks made of PVC pipes. In addition, we have prepared detailed instructions for the manufacture of two product options, which it will not be difficult to assemble even for a novice master. To do this, you need a minimal set of tools and a little patience.
The content of the article:
A variety of shapes and designs
Floor racks are an integral part of our daily lives. They can be found not only in homes, but also in bars, restaurants, offices. There is hardly a place where there is no device for storing clothes.
Now there is a huge variety of these designs. They can be made from almost any material, and any home craftsman or craftswoman will be able to design a hanger from polypropylene pipes independently.
If there are absolutely no ideas what your coat rack might be, then you can draw them by looking at designs from various materials, not necessarily plastic.
For stability, the hanger from plastic pipes can be screwed to the wall, insert a spacer between the legs or fill the pipe with filler in the form of sand or small pebbles.
If you need a functional hanger for dresses / shirts, then you should opt for a U-shaped design in which the vertical racks are connected by horizontal jumpers. In order to prevent the upper bar from sagging under the weight of clothes, a metal bar can be inserted into it.
For the hallway or cottage, the option is in the form of a floor stand with hooks for clothes. Such a product can be easily placed in the corner of the room, so that it does not take up much space.
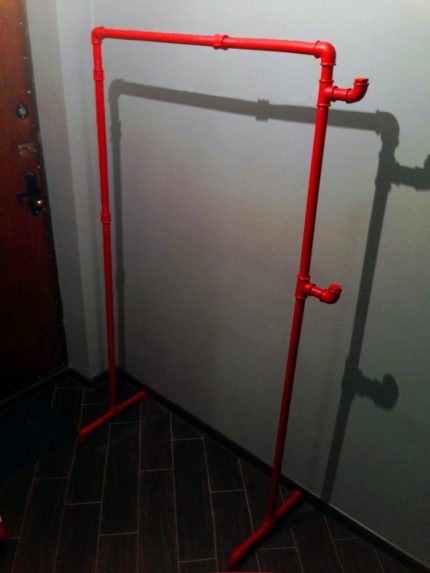
Step-by-step instructions for constructing a hanger
Before proceeding with the construction of the hanger, it is necessary to stock up on the tools and materials that will be needed for work. In any case, you will need to purchase polypropylene pipes and fittings suitable size, paint, if there is a desire to make the hanger original.
In addition, you will need: a pipe cutter or a saw for metal, soldering iron pipes or special glue for plastic, a screwdriver or drill, screws.
What stages the process of constructing a hanger consists of, we will describe on the example of the two simplest designs.

Option number 1 - rack for outerwear
Such a product is sure to come in handy in the hallway, especially if space is limited. In addition, the plastic hanger has many advantages.
We list only a few of them:
- mobility - this design is easy to move from place to place;
- compactness - the product does not take up much space;
- availability - the design is made of inexpensive materials;
- simplicity of execution - even an inexperienced master can cope with the task.
Before you begin the construction of a rack for outerwear, you need to decide on its location in order to correctly calculate the size of the product.

So, for work you will need the following set of tools: tape measure, hacksaw or pipe cutting shears, sandpaper, special glue, sand or small pebbles, paint, if painting is planned.
From the materials you will need to purchase the following:
- polypropylene pipe with a diameter of at least 25 mm (it is better to take 32 mm) - 2.5 m;
- corners for pipes of the corresponding diameter - 10 pieces;
- tees - 6 pieces;
- plugs for pipes - 8 pieces.
Having prepared everything you need, you can begin to work.
In order to simplify the assembly process, you need to distribute all the parts into groups: blanks for the base, for branches (hanger arms) and for the rack. The first group will include: 4 elbow joints, 3 tees and 6 tubes of 12 cm each.
To assemble one branch, you will need a tube 15 cm long, a corner and a tee, and there are three such branches in total. Tubes 20, 30 and 80 cm will go to the assembly of the rack.
On the ends of the legs of the hanger, branches and the upper part of the rack put on the stub. After assembling and gluing the product, you should wait at least 24 hours and only then start using it.
As you can see, there is nothing complicated in assembling a rack-hanger.
Option number 2 - a hanger for children's clothing
This product will require a little more materials and assembly time. But your child will certainly appreciate this design. And you can even bring a baby to the assembly.
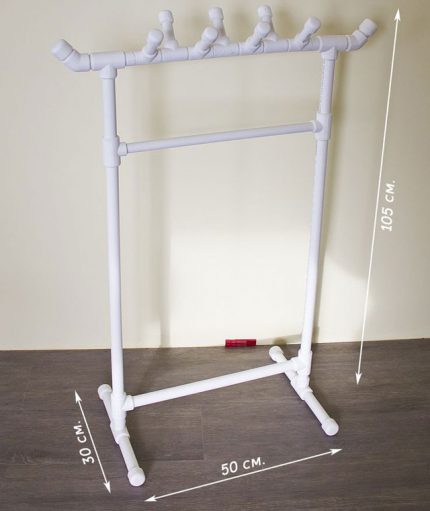
As with the hanger rack, you will need a similar set of tools. The number of consumables will have to be calculated independently, depending on the place where the structure will be located and its height.
To assemble a children's hanger of the indicated sizes, you will need to prepare: a pipe of the selected diameter, as well as the corresponding tees, angles, adapters, plugs, glue for PVC pipes or soldering iron. To calculate the required amount of consumables, it is advisable to depict the project on paper.
By the way, it is not necessary to fill the foundation of this design with sand or pebbles, it turns out to be light and stable, so the child is able to independently move it from place to place.
After waiting about a day, the product can begin to be used. Here you can hang not only outerwear, but also umbrellas, hats, backpacks.
Recently, it has become fashionable to collect hangers for everyday clothes. They can not only save space, but also become an original design solution for the interior. Moreover, their creation does not require special knowledge or skills.
We have prepared a series of articles on the manufacture of various crafts from plastic pipes. We advise you to familiarize yourself with:
- How to make a chair from polypropylene pipes with your own hands: step-by-step instructions for manufacturing
- Screen made of plastic pipes: types of partitions + step-by-step manufacturing instructions
- DIY crafts from propylene pipes: do-it-yourself homemade options
Conclusions and useful video on the topic
And how to design a hanger from polypropylene pipes will be discussed in the following video:
Another option for creating a hanger from water pipes will be considered below:
As you can see, there is nothing complicated in creating a hanger from polypropylene pipes. You just need to stock up on ideas, prepare the right option and the original design solution is ready. It remains only to bring it to life.
Tell readers about your experience in building various crafts from plastic pipes. Please leave comments on the article, ask questions, participate in discussions and add photos of your homemade products. The contact form is located below.

 DIY crafts from propylene pipes: do-it-yourself homemade options
  Soldering of copper pipes: step-by-step analysis of work and practical examples
  How to make a chair from polypropylene pipes with your own hands: step-by-step instructions for manufacturing
  Screen made of plastic pipes: types of partitions + step-by-step manufacturing instructions
  How to arrange a pipe box in the toilet: an overview of the best ways to mask the pipeline
  Heating cable for sewer pipes: types, how to choose and correctly carry out installation
  How much does it cost to connect gas to a private house: the price of organizing gas supply
  The best washing machines with dryer: model rating and customer tips
  What is the color temperature of light and the nuances of choosing the temperature of the lamps to suit your needs
  Replacement of a geyser in an apartment: replacement paperwork + basic norms and requirements
PVC pipes themselves are an excellent material for all kinds of crafts, as long as hands grow from the right place. The material is plastic, moderately hard and durable. I saw in my friend’s garage a hanger made of PVC pipes, a small one, hung on the wall, but I didn’t even think that there are so many different options for hangers. What else attracted me - production speed and durability - does not oxidize, does not rot, does not need to be painted. Great invented!
An interesting notion. Yes, I would have done such a hanger in my apartment unless as a temporary option, all the same, the aesthetics of this design are not enough, for my taste. But for a summer house or a garage, a very good solution is functional and easy to assemble, from inexpensive material.The only thing, as written in the material, a pipe cutter is very desirable, and not everyone has such a tool.