How to connect a motion sensor to a light bulb: step by step instructions
Using a motion sensor to activate lighting at the moment of approaching the lamp significantly increases the level of comfort in the house / office / apartment. A miniature device manages the system for you, allowing you not to care about such trifles. Electricity consumption is reduced, and you can easily install it yourself.
Economical from all sides, the device is worth getting. Do you agree? We will tell you how to connect a motion sensor to a light bulb. In the article we presented, technological rules and schemes are available that are accessible to a beginner electrician. The accommodation options are listed, the specifics of the setting are described.
The content of the article:
Motion sensor: basic functions and principle of operation
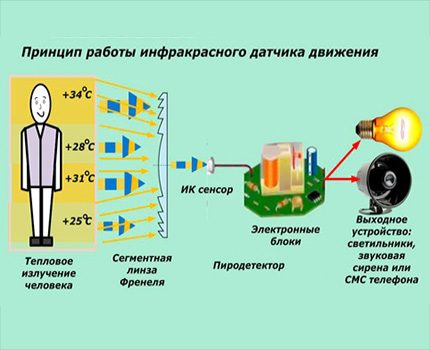
The main purpose of the motion sensor is switching the electrical network. It can work both with active load in the circuit, and with active-inductive. Any movement in the controlled zone primarily starts the process of determining the level of illumination (if such a function is provided in the device).
If the indicator is below the set threshold, the device closes the contacts and turns on the lamp. Thus, the detector can operate both at night and in the daytime. Set the threshold with the help of regulators, it can be from 3 to 2,000 lux.
In everyday life, devices are most often installed whose operation is based on capturing the electromagnetic waves in the infrared spectrum. The time after which the detector is triggered, in case a moving object is detected, is also adjusted.
Turning the knob sets the shutter speed. For different models, the delay time can be adjusted from 10 s to 7-15 minutes (a slight error is allowed).
Landmarks of a competent choice
Different models may have different purposes.Some are intended only for controlling indoor lighting fixtures, others are more versatile and can be used for circuits with electrical appliances, with alarm devices, with street lighting system.
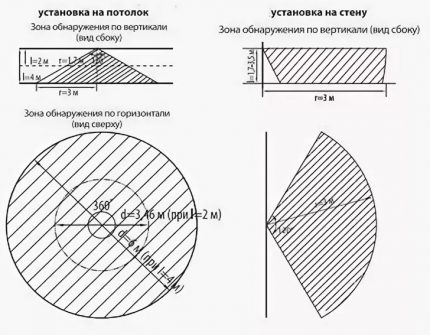
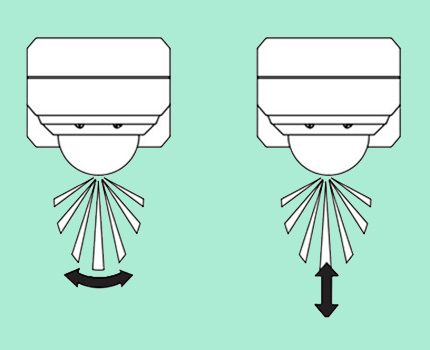
Sensors can be with a limited and circular view, have different angles of horizontal and vertical observation. Wall-mounted devices control the zone at an angle of 110–120 ° or 180 ° horizontally and 15–20 ° vertically.
Models with a moving viewing body make it much easier to set up, but stationary models do not have such an opportunity, so you need to carefully choose a placement for them.
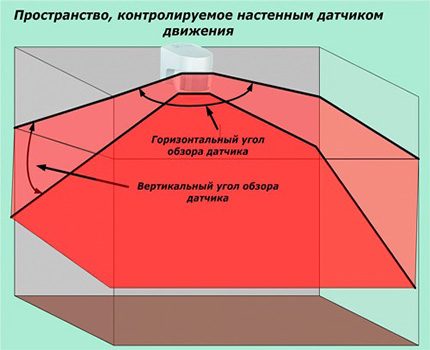
Detectors with a circular view can cover the controlled area at an angle of 360 ° horizontally. Their field of view has the shape of a cone, expanding downward. Despite the large control zone, areas that are not visible (outside the radius, in the corners) in the room still remain.
To install the sensor on the street or in rooms with high humidity, you must choose a device with a high degree of protection from external factors (dust, moisture).
For example, devices with a protective degree of IP20 can only be used in indoor rooms with normal humidity, with IP33 it can be installed outdoors - on the terrace, porch, gazebo. With IP44, you can mount it on the street, but protect it with a visor from dripping water during precipitation.
You can buy a ready-made complex from switch and motion sensor. The features of its selection and installation will be introduced by our recommended article.
Placement and orientation method
The general rules for installing sensors are as follows:
- installation height above the observed surface can be from 2.5 to 4 m (the parameter depends on the model of the device);
- when choosing a mounting location, it is taken into account that the detector is more sensitive to movement that occurs across the observation area;
- The total load power of the lamps is limited and can be, for example, from 60 to 1200 W for incandescent bulbs and from 0 to 600 W for fluorescent illuminators.
The sensitivity of the detector is also affected by temperature. The temperature range at which the device normally performs its functions is from -20 to 40 ° C.
It is forbidden to install lamps:
- on vibrating surfaces;
- near fans, air conditioners;
- on glossy white surfaces of walls;
- near heat sources - electric radiatorslamps;
- on the surface, under direct sunlight.
To avoid false alarms, exposure to infrared detector sources of electromagnetic waves, wind and heat fluxes are avoided.
It is also impossible to get into the coverage area incandescent lamp - a gradually cooling thread will trigger the detector, since it will react by switching on a change in its temperature.
This can go on ad infinitum - the light will turn on and off. False alarms can also occur in windy weather due to waving branches.
How to install the device and connect it to the lamp?
To begin, consider the installation of a motion sensor using the example of models that are installed in holes designed for spotlights.
The installation steps are as follows:
- Turn off the voltage in the mains.
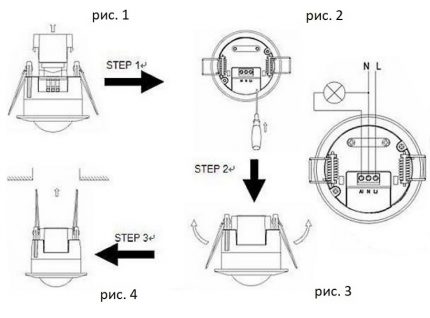
- Remove the protective plastic cover (Fig. 1).
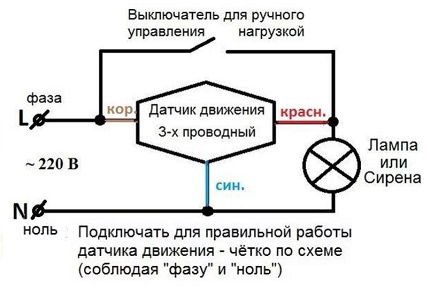
- Connect the conductors (Fig. 2). The manufacturer indicates the connection diagram on the device itself and in the device passport.
- Bend the retaining springs, directing them up (Fig. 3).
- Install the sensor in the prepared hole (Fig. 4) - the springs will fix its position.
Installation can be considered completed. It remains to adjust and test the operation of the device.
It is easier to install a sensor that is screwed into the cartridge. Then a light bulb is screwed into it. In this case, it is necessary to use only those lamps that are not more powerful than indicated in the device passport. It is advisable to purchase specialized lampsdesigned to work in tandem with detectors.
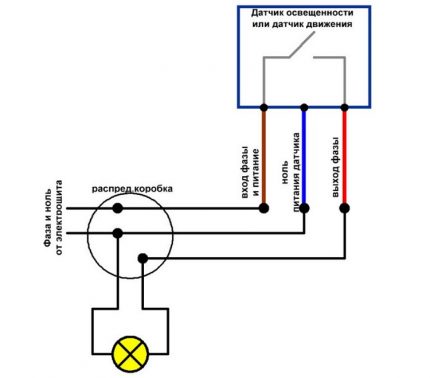
To install the remote sensor in the ceiling, wall or lamp housing, it is necessary to bring the device into the prepared hole, screw the housing to the mounting surface using self-tapping screws. Next, you need to turn off the mains power and connect the phase and neutral conductor of the power cable to the terminals according to the diagram.
Testing and tuning the motion sensor
Each device has at least two controls. Testing and tuning are performed according to two main parameters - the duration of the glow (TIME) and the response sensitivity (LUX). The first indicator means the period of time for which the sensor leaves the lamp on.
With each recognizable movement, the countdown of the duration of the glow begins again. It can be adjusted by the user for a period of 10 s to 4 minutes.
The sensitivity of the device is also adjustable. With it, you can adjust at what level of natural light the light will turn on. Thus, you can configure the lamp to be turned on during the day and night, or only at night.
Starting the motion sensor in the work, conduct its mandatory testing. To do this, set the dimmer to the position corresponding to daylight. The time control knob is set to a minimum.
After connecting to the power supply, you must wait about 30 seconds - the sensor will work and turn on the light for 30 seconds. Next, send the sensitive area of the sensor to the area that should be monitored, check the sensitivity and range.
Test to see if the lamp lag and lamp operation time are within the specified parameters. They also check the operation of the device at night and finally set the parameters that are comfortable for themselves.
More complex devices, which are used for security purposes, have in their design also a range controller (SENS). With it, the sensitivity zone is set. The sensors are also equipped with a built-in microphone with a noise level control (MIC), at which the device should work.
The last two regulators are rarely used for inexpensive sensors, since their functionality in domestic conditions is rarely in demand.
Options for connecting an IR device to a lamp
Using various connection schemes and additional devices, it is possible to achieve a wider functionality of the motion sensor.For example, expand the controlled area, disable automatic control of the lighting system or temporarily control the lighting group without the participation of a motion sensor, etc.
Connection for control without switch
The circuit, consisting of a lamp and a detector, is the simplest. It is applied by the manufacturer on the back of the device or is described in the attached instructions.
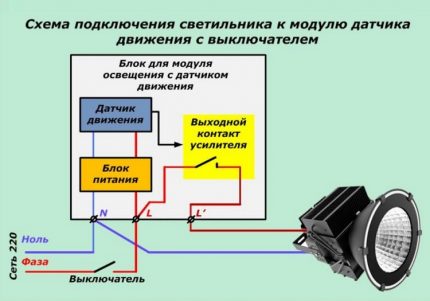
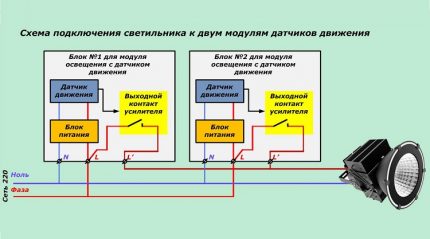
When arranging elongated rooms, along paths in the courtyard or around the perimeter of a building, a single device to detect movement is not enough to control the lighting - its limited view does not allow this.
In such cases, two or more detectors are used. Their terminals of the same name are connected in parallel, and then lead to the lamp.
Connection to a bulb with a switch
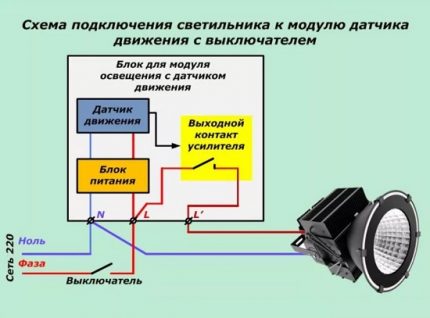
To turn off the automatic switching system, which operates on the basis of a motion detector, a switch is added to the working circuit. Connect it to the portion of the incoming supply cable in front of the sensor.
In the on position of the circuit breaker, the circuit works as if composed without it. When it is turned off, the motion sensor module is completely de-energized and the system does not work.
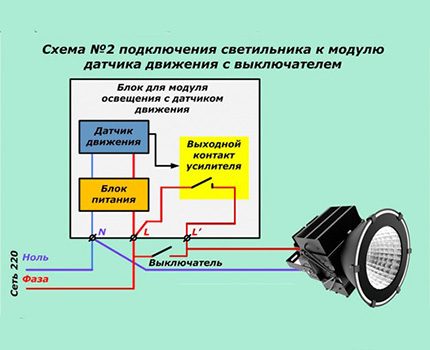
If it is necessary that when a person is in the room, the light is on, while being in a fixed position does not turn off the lighting, then use the following scheme.
A switch is connected to the input and output phase conductor of the sensor - thus, a branch of the electrical network is created bypassing the main section. Now, using the switch, you can turn on the lighting, which will not depend on motor activity in the controlled area.
Proven connection diagrams of the lighting control device using a switch are disassembled and given in the article, which we highly recommend reading.
Conclusions and useful video on the topic
Video # 1. How to connect the device according to a simple scheme and configure it:
Video # 2. Two options for connecting the sensor to a lamp with a switch:
The way the motion sensor is connected to the lamp largely depends on the goals that you plan to achieve. Based on that, it is necessary to organize automatic lighting in an apartment or on the street, near a guarded building or garage, select a device and a working scheme.
Want to talk about how you connected the motion sensor to the bulb with your own hands? Do you have useful information on a topic that can help website visitors? Please write comments in the form below the block, post a photo in it and ask questions.

 Lamps with a motion sensor: how they work, how to connect + TOP of the best manufacturers
  Phase control relays: operating principle, types, marking + how to adjust and connect
  DIY Solid State Relay: Assembly Instructions and Connection Tips
  Solid State Relays: Types, Practical Applications, Wiring Diagrams
  Limit switch: what is it, marking + connection rules
  Uninterruptible for TV: 12 best UPS models + valuable tips before buying
  How much does it cost to connect gas to a private house: the price of organizing gas supply
  The best washing machines with dryer: model rating and customer tips
  What is the color temperature of light and the nuances of choosing the temperature of the lamps to suit your needs
  Replacement of a geyser in an apartment: replacement paperwork + basic norms and requirements
In principle, a very useful topic. You put a spotlight or lamp at the entrance.You connect it through a motion sensor, and beauty. Came out at night - clicked and turned on. He left, turned off. Conveniently. There are really two nuances. It is undesirable for the system to work during the day, it would be better not to turn off while the object is in the field of view of the sensor. When choosing a sensor, it is necessary to take into account the possibility of such a setting.
This is all adjustable on modern motion sensors. However, from experience, the sensitivity level is not so simple to adjust.
Good day, Sergey. If you re-read the article, it turns out that the nuances indicated by you have long been resolved. You just have to buy a sensor to make sure that there is a function for determining the "night" - insufficient lighting. She, the “function”, decides to turn on the light or not. If you bought without it, and then realized, it’s also not scary - put a key switch (you will turn it off during the day).
This site offers another article - “Switch with a motion sensor: how to choose and install a light switch with a sensor”. There you read about the types of sensors - they are triggered by sound, infrared radiation, ultrasound, microwaves. Infrared, for example, will not turn off the light while in the "zone" of a person.
I have a question on these sensors, the movement to those who have already put such houses: are there any problems with the setup? It was just that we had a similar device in the entrance, often there were false alarms, or vice versa, a very slow response when you had time to pass the passage and only then did the light come on. So they drove an electrician, he all tried to properly adjust the sensitivity of the device. For an apartment, this would be an unpleasant situation.
Good afternoon, Alexander. We put infrared sensors with a coverage angle of 180 degrees - they work clearly. We took into account the experience of the neighboring house - there, waiting for the elevator, you have to wave your hand occasionally to turn on the light. Read the article on this site - “Motion switch". The material contains answers to your questions.
Put men like that in the toilet. Come in - the light turns on. He sat on the pot - turns off. That's right, what is there to watch)))
Good afternoon, Egor.
Your comment about “Measure seven times ...” - the designers always have to draw up a “feasibility study”. There, the customer of the project is provided with the calculation of the payback time of the device, installation, facility.
In relation to the toilet sensor, the situation will look as follows:
- loss of electricity from a useless burning lamp - ≤ 5% of the electricity consumption of the apartment;
- the cost of the purchase, installation of the sensor. So that the device does not annoy, you must purchase an expensive one. For example, the high-quality MTN564419 manufactured by Schneider Electric will cost $ 25,000. Buy, Chinese for 300 rubles, you will suffer.
Substitute the economic indicators of your case and it turns out that even the average price sensor will pay off in centuries.
For the sensor to work correctly:
1. It must be placed in the right place.
2. You need to know what kind of collecting lens it has.
3. And, in fact, understand the principles of operation of this sensor in order to use it correctly.
By the way, sensors with 2 elements inside the sensor have recently gained popularity - it reacts to a temperature change between elements that occurs sequentially when a person moves. But he also has his own drawback - if you stand still, then he does not see you 🙂
I just connected it ... It’s not yet clear, it will be necessary to check in the afternoon.